

Jan 11, 2024
Integrating Adobe Experience Manager (AEM) with third-party applications, including Salesforce, is not a one-size-fits-all solution. Each integration comes with its own level of complexity and recommended implementation approach. In this blog, we will delve into the possibilities of integrating AEM with Salesforce and propose our own suggested approach to successfully achieve bidirectional integration.
Adobe's Salesforce API Package
One logical approach to integrate AEM with Salesforce is to explore any recommendations or offerings provided by Adobe. In fact, Adobe offers a "Salesforce API" package specifically designed to facilitate this integration. The package encompasses the following components:
A cloud configuration
A couple of demo components
A demo workflow step
The provided demo components and workflow steps are designed to transfer "AEM users" to Salesforce as "Salesforce Leads". However, it's important to note that the demo components were specifically created for the classic UI and not optimized for touch UI usage.
It's not uncommon to encounter challenges when using these components in the touch UI environment. So, we developed our custom demo component(s) to achieve the desired integration successfully.
A "New" Approach
Upon delving into the inner workings of the "Salesforce API," it became clear that the pivotal aspect of integration lies in OAuth 2.0. Put simply, Adobe's cloud configuration approach involves storing the required information for OAuth to facilitate communication between AEM and Salesforce. With this in mind, the new approach essentially remains the same: leveraging the OAuth protocol to establish seamless communication between AEM and Salesforce.
How OAuth Works
Before starting the tutorial, we need to know what OAuth is and how it works.
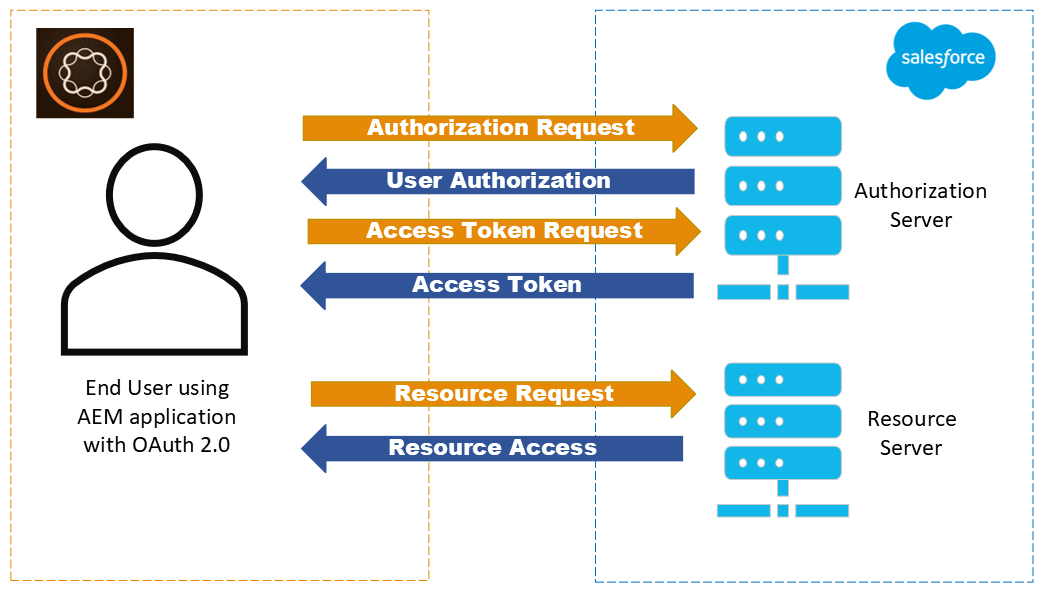
OAuth (Open Authorization) is a widely adopted authorization protocol that enables secure access to protected resources on behalf of a user without sharing their credentials. The OAuth 2.0 flow involves several entities: the resource owner (user), the client (application), the authorization server, and the resource server.
The flow starts when the client obtains an access token from the authorization server by authenticating the resource owner. The client then presents this access token to the resource server to gain access to the protected resources on behalf of the resource owner. This allows the client to access the desired resources without requiring the resource owner to share their credentials directly with the client.
Using access tokens, OAuth ensures that the user's credentials are not exposed to the client application, enhancing security and privacy.
Implementing the Integration
In this demo, the main focus will be on the detailed process of pushing a Lead from a form residing in AEM. To delve into the technical aspect, we will start by enabling OAuth 2.0 in Salesforce, allowing AEM to request an access token.
Next, we will create an AEM component, which serves as a basic form to collect user-provided information and transmit it to Salesforce utilizing the access token.

Prerequisites:
Salesforce Account: A free Salesforce Developer Edition account is sufficient. Create a developer account on the Salesforce platform to get started.
If you use the Salesforce Enterprise edition, note that you must enable the REST API through the "Setup" panel. Contact Salesforce support for further assistance if you can't access this option.
1. Enabling OAuth 2.0 in Salesforce
This step primarily involves Salesforce configuration, which is slightly beyond the scope of this discussion. Plenty of resources provide more detailed explanations on accomplishing this if required.
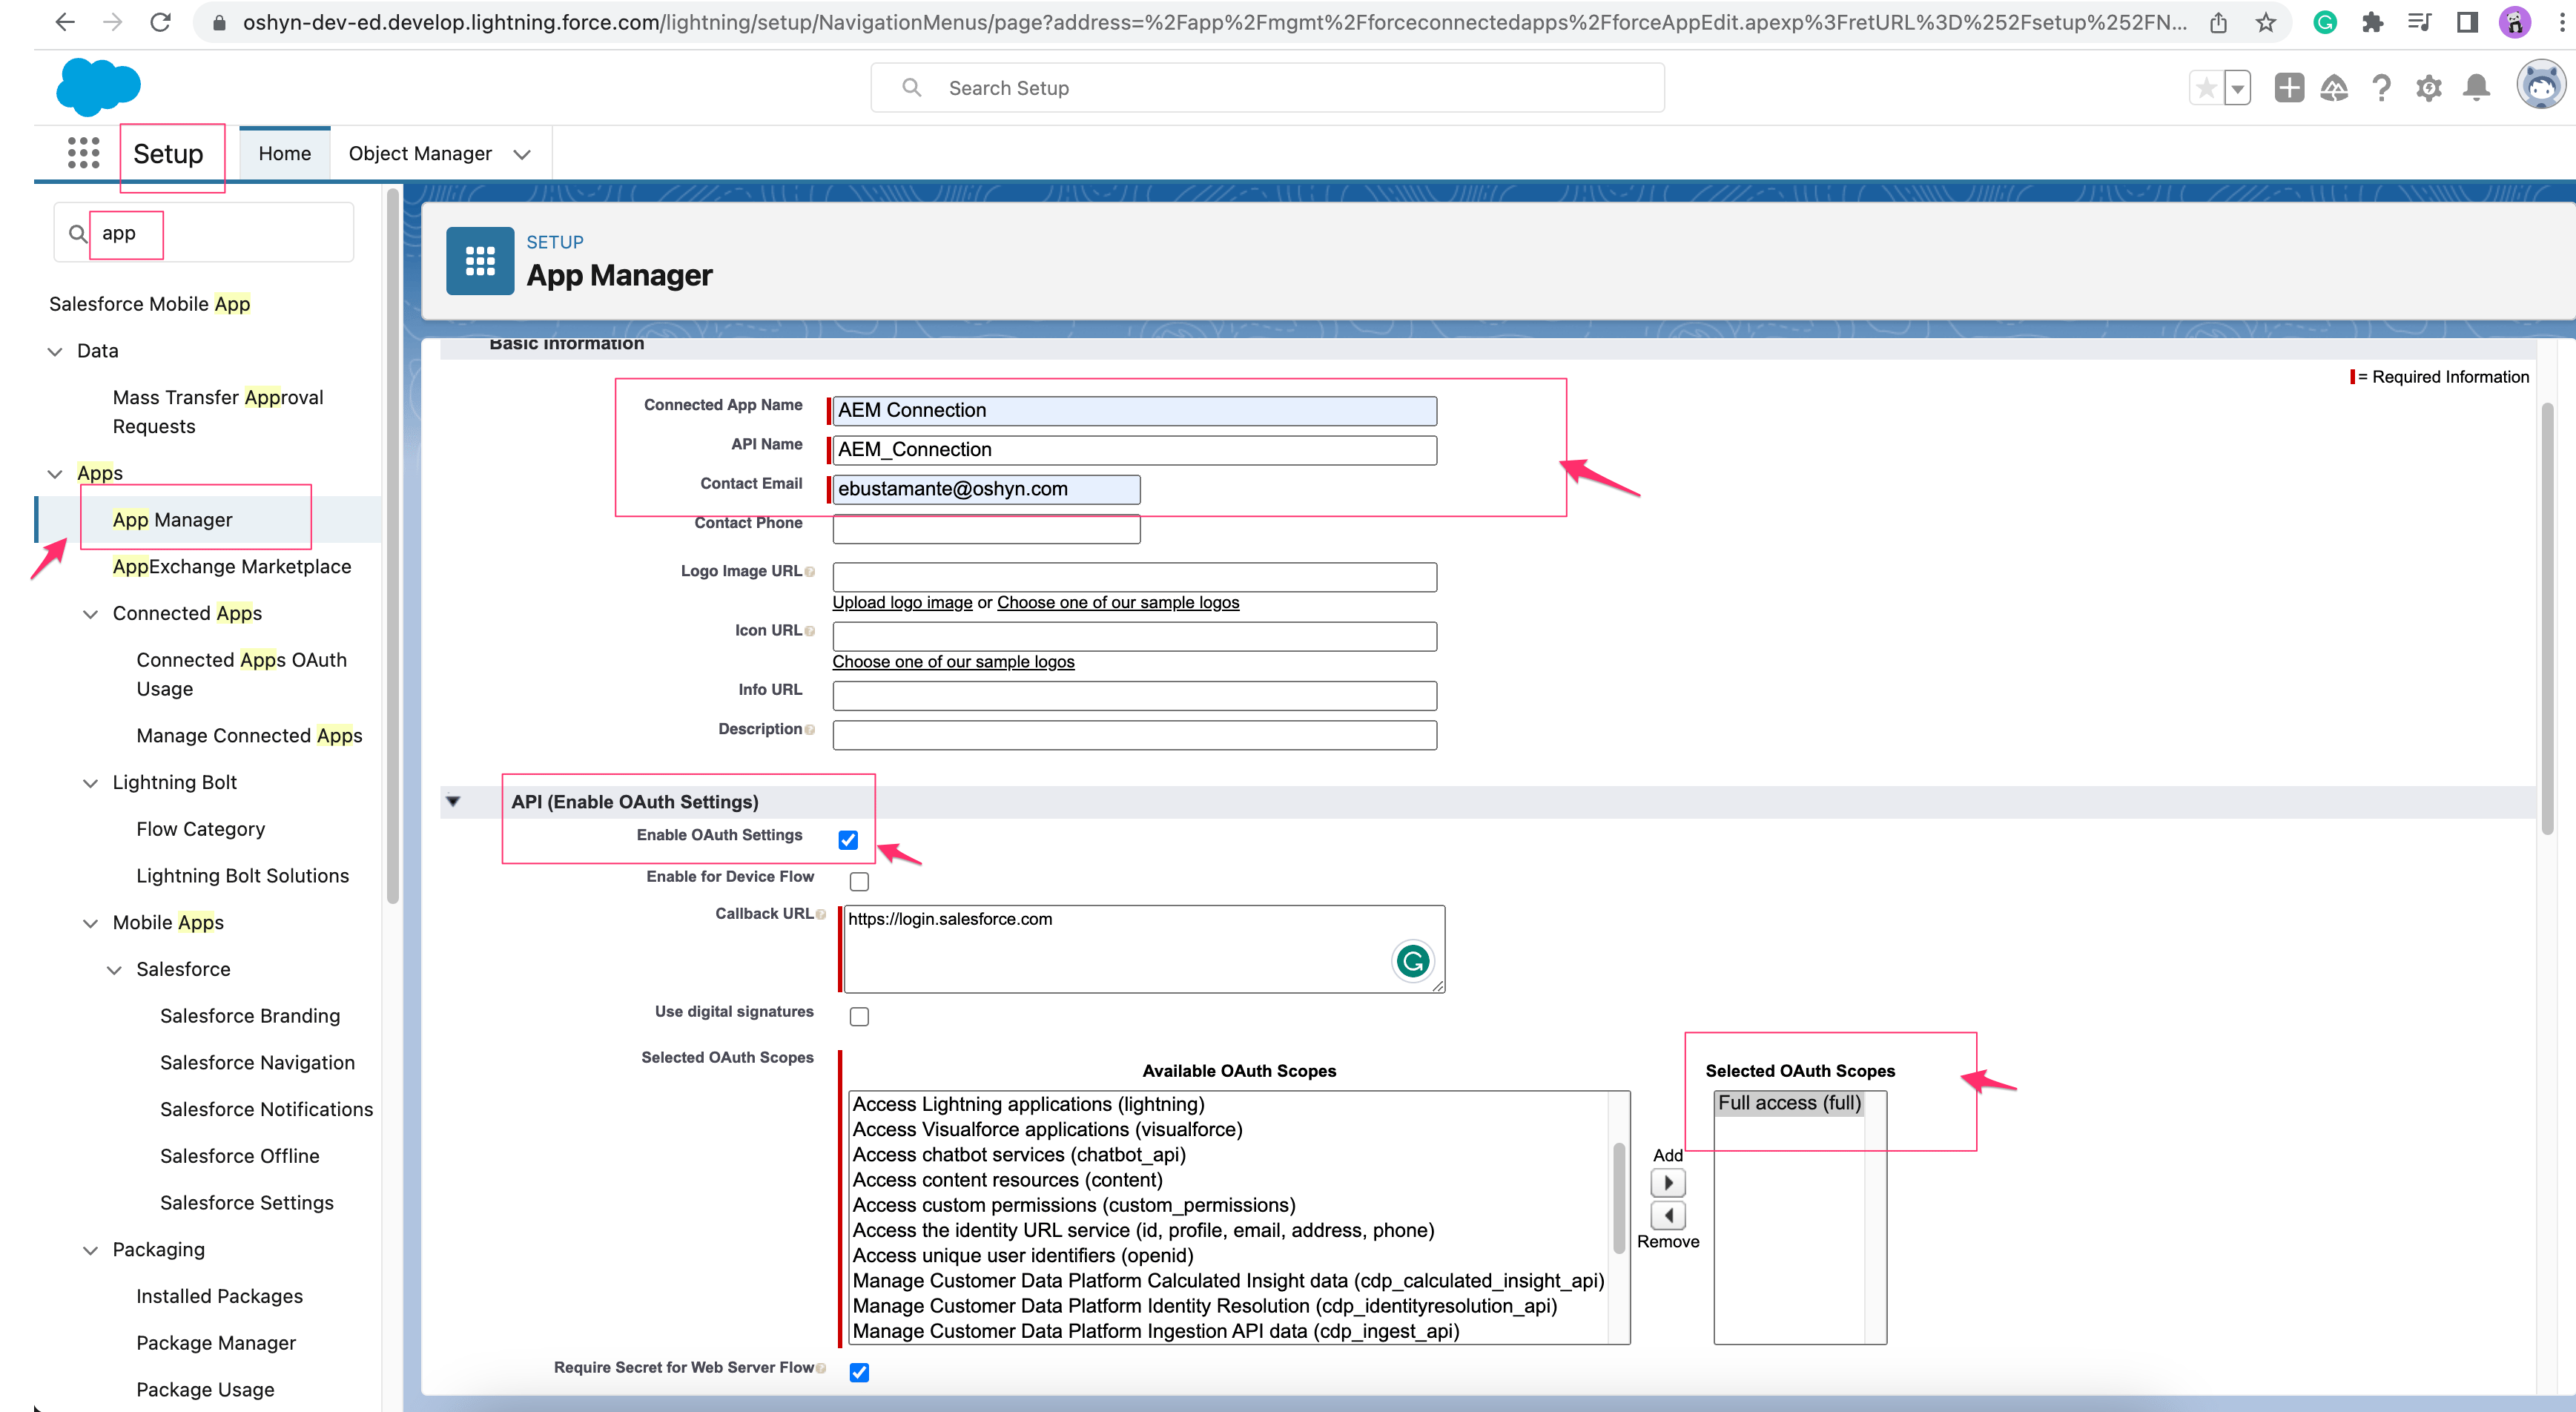
Create a new connected app. Go to the "Setup" menu, and then look for the "App Manager". Once there, go ahead and create a "New Connected App"
Complete the required fields
Enable the OAuth protocol.
Setup the OAuth scopes. For this demo we used "Full Access"
Save and wait for about 15 minutes. (This is required by Salesforce, you will see a note there)
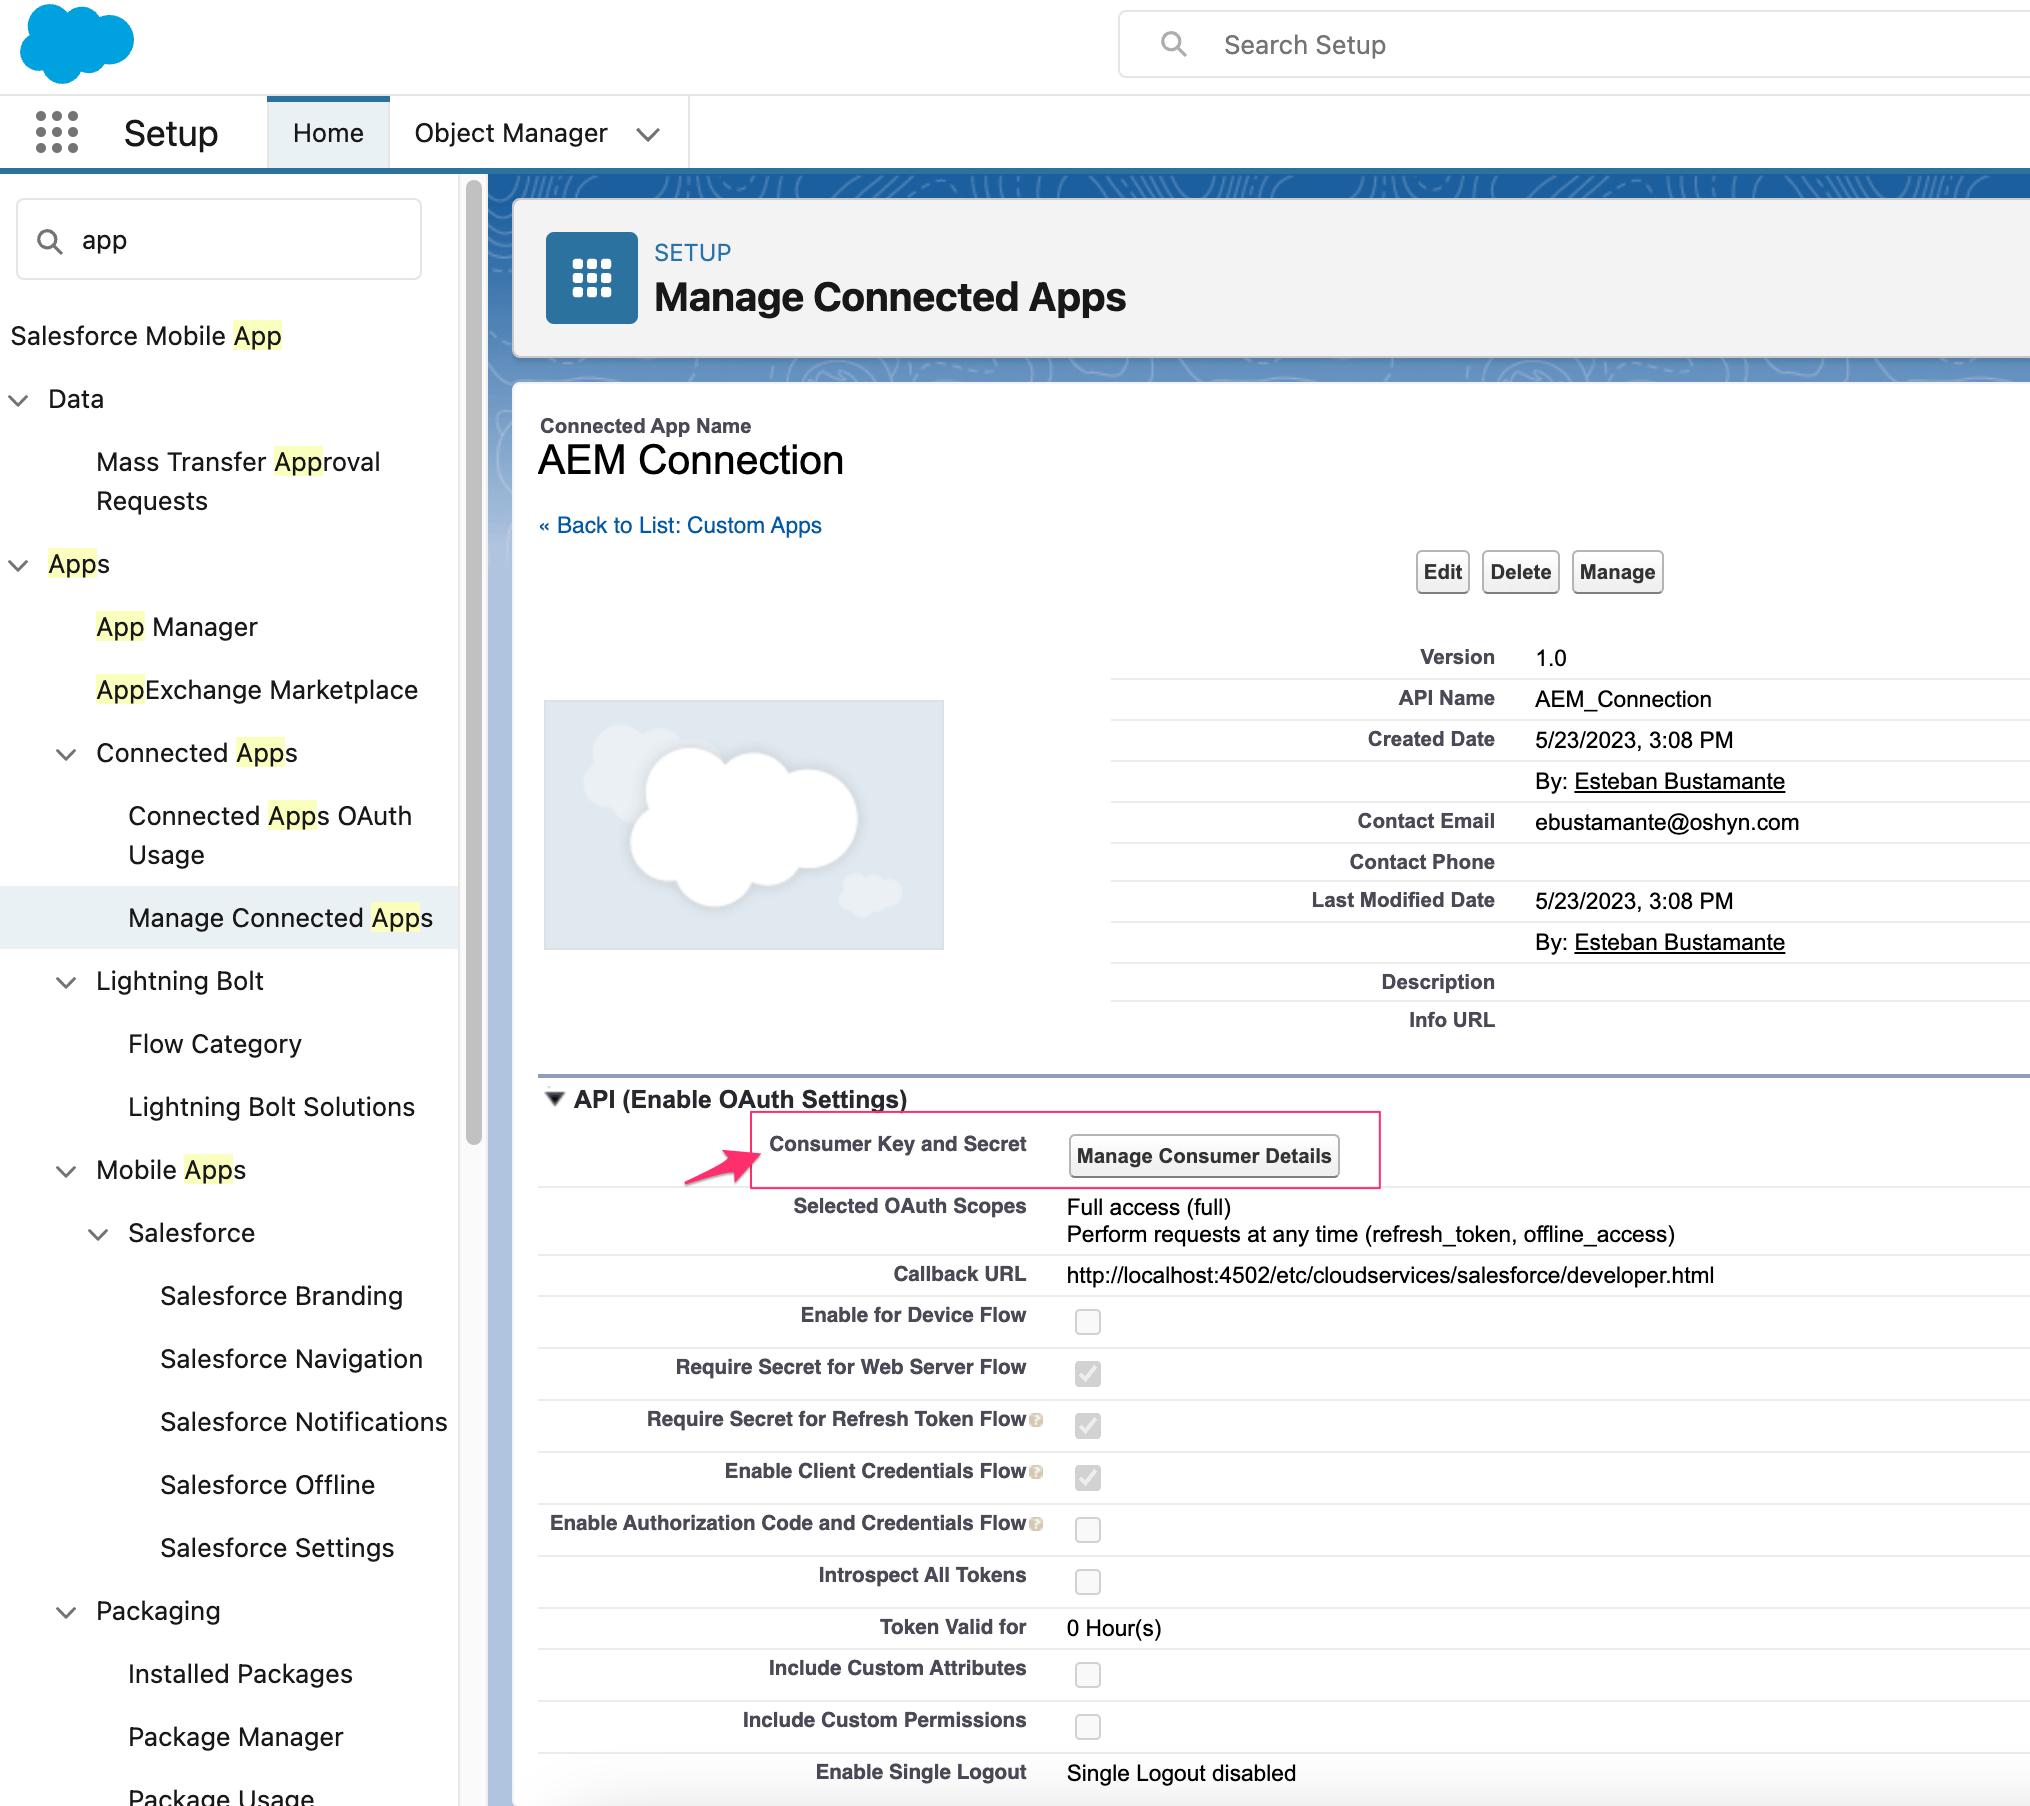
Once you have done this, you will find the "Consumer Key and secret." Keep these handy, as we will use them to generate the Access token later.
2. Create the Backend For Our Component(s)
This section aims to develop the necessary methods for retrieving the Access Token from Salesforce using the provided "Consumer Key and Secret" (as mentioned in step 1).
Then, we will use this Access Token to perform a POST request and store a Lead in Salesforce. We've provided a brief demonstration of how to accomplish this, but feel free to implement it in your preferred manner.
Within an OSGi Service, let's create a method that will handle the POST request to Salesforce, allowing us to get the accessToken by providing the required information. The relevant part here is the URL you will need to use, which follows the below format:
//URL base
private static final String AUTHOTIZATION_URL = "https://login.salesforce.com/services/oauth2/token";
...
...
/** Required information to get AccessToken
 *  You will need to keep this info in a secure place
 *  You can use Cryto feature as well to be protected.
**/
String clientId = "xxxx"; //Consumer KEY
String clientSecret = "xxxx"; //Consumer Secret
String username = "xxx@xxx"; //Salesforce account username
String password = "xxxyyy"; // Salesforce account Password + Seurity Token
...
...
String urlParams = String.format("?grant_type=password&client_id=%s&client_secret=%s&username=%s&password=%s", clientId, clientSecret, username, password);
String urlToGetAccessToken = AUTHOTIZATION_URL + urlParams;

...
...
public String getBearerToken(String urlToGetAccessToken) {
...
//Execute a POST with the URL provided, i.e: urlToGetAccessToken
...
}
Create another method that will POST the Lead information to Salesforce. Make sure to include the Authorization header with the type Bearer, which is what Salesforce uses by default. (Don't forget to append the data which will be passed to Salesforce).
//Note that the below URL is specific to my Salesforce account and data object version
String url = "https://oshyn-dev-ed.develop.my.salesforce.com/services/data/v49.0/sobjects/Lead";

public String addLead(String url, String bodyContent, String accessToken) {
    final HttpURLConnection connection = getConnection(url);
    try {
       ....

        //Set the Authorization
        if (StringUtils.isNotBlank(accessToken)) {
            String bearerToken = "Bearer " + accessToken;
            connection.setRequestProperty ("Authorization", bearerToken);
        }
        //Append the data from the form in the request
        if (bodyContent != null) {
            try (OutputStreamWriter writer = new OutputStreamWriter(connection.getOutputStream())) {
                writer.write(bodyContent);
                writer.flush();
            }
        }

      ....
}
Create a servlet that will invoke the previous OSGI service and can be accessed through the front end via Javascript.
@Component(service = { Servlet.class })
@SlingServletResourceTypes(
        resourceTypes="oshynDemo/components/page",
        methods={HttpConstants.METHOD_GET, HttpConstants.METHOD_POST},
        selectors = "salesforce",
        extensions="json")
@ServiceDescription("Salesforce Demo Servlet")
public class SalesforceServlet extends SlingAllMethodsServlet {

    @Reference
    private transient SalesforceService salesforceService; //This is our service previously create
    ...
    ...
    ...

    @Override
    protected void doPost(final SlingHttpServletRequest req, final SlingHttpServletResponse resp) throws ServletException, IOException {
        ...
        ...
        String bodyContent = getRequestBody(req); //Read the info sent from the component
        String token = getAccessToken(); // Will invoke our first method, e.g.: "salesforceService.getBearerToken(url)"
        if (StringUtils.isNotBlank(token)) {
            dataResponse = salesforceService.addLead(POST_LEAD_URL, bodyContent, token);
            ...
            ...
        }
        ...
        ...
        resp.getWriter().write(dataResponse);
    }
3. Create the Front end for Our Component(s)
This section aims to create a simple form that will POST the information from the form to our servlet. Make sure to POST the data posted matches the fields of a Lead object in Salesforce. Any details about the CSS are out of the scope of this blog so haven’t been added. But for reference, this is how the HTML and JavaScript will look.
<div class="cmp-sfform" data-cmp-is="sfform">
    ...
    ...
    <form id="sfform__form">
        <h2>Contact</h2>
        <p>* Required</p>
        <input type="text" name="FirstName" placeholder="FirstName *" />
        <input type="text" name="LastName" placeholder="LastName *" />
        <input type="email" name="Email" placeholder="Email *" />
        <input type="text" name="Company" placeholder="Company" />
        <input type="phone" name="Phone" placeholder="Phone" />
        <textarea rows="4" name="Description" placeholder="Message"></textarea>
        <button>Submit</button>
    </form>
    ...
    ...
</div>
OshynDemo.$form.addEventListener("submit", (event) => {
    event.preventDefault();
    ...
    ...
    fetch("/content/oshynDemo/us/en/jcr:content.salesforce.json", {
        method: "POST",
        headers: { 'content-type': 'application/json', 'Accept': 'application/json' },
        body: JSON.stringify(data) //data is the information from the form
    })
    .then((response) => { ... })
    .catch((error) => { ... });
});
The Final Result
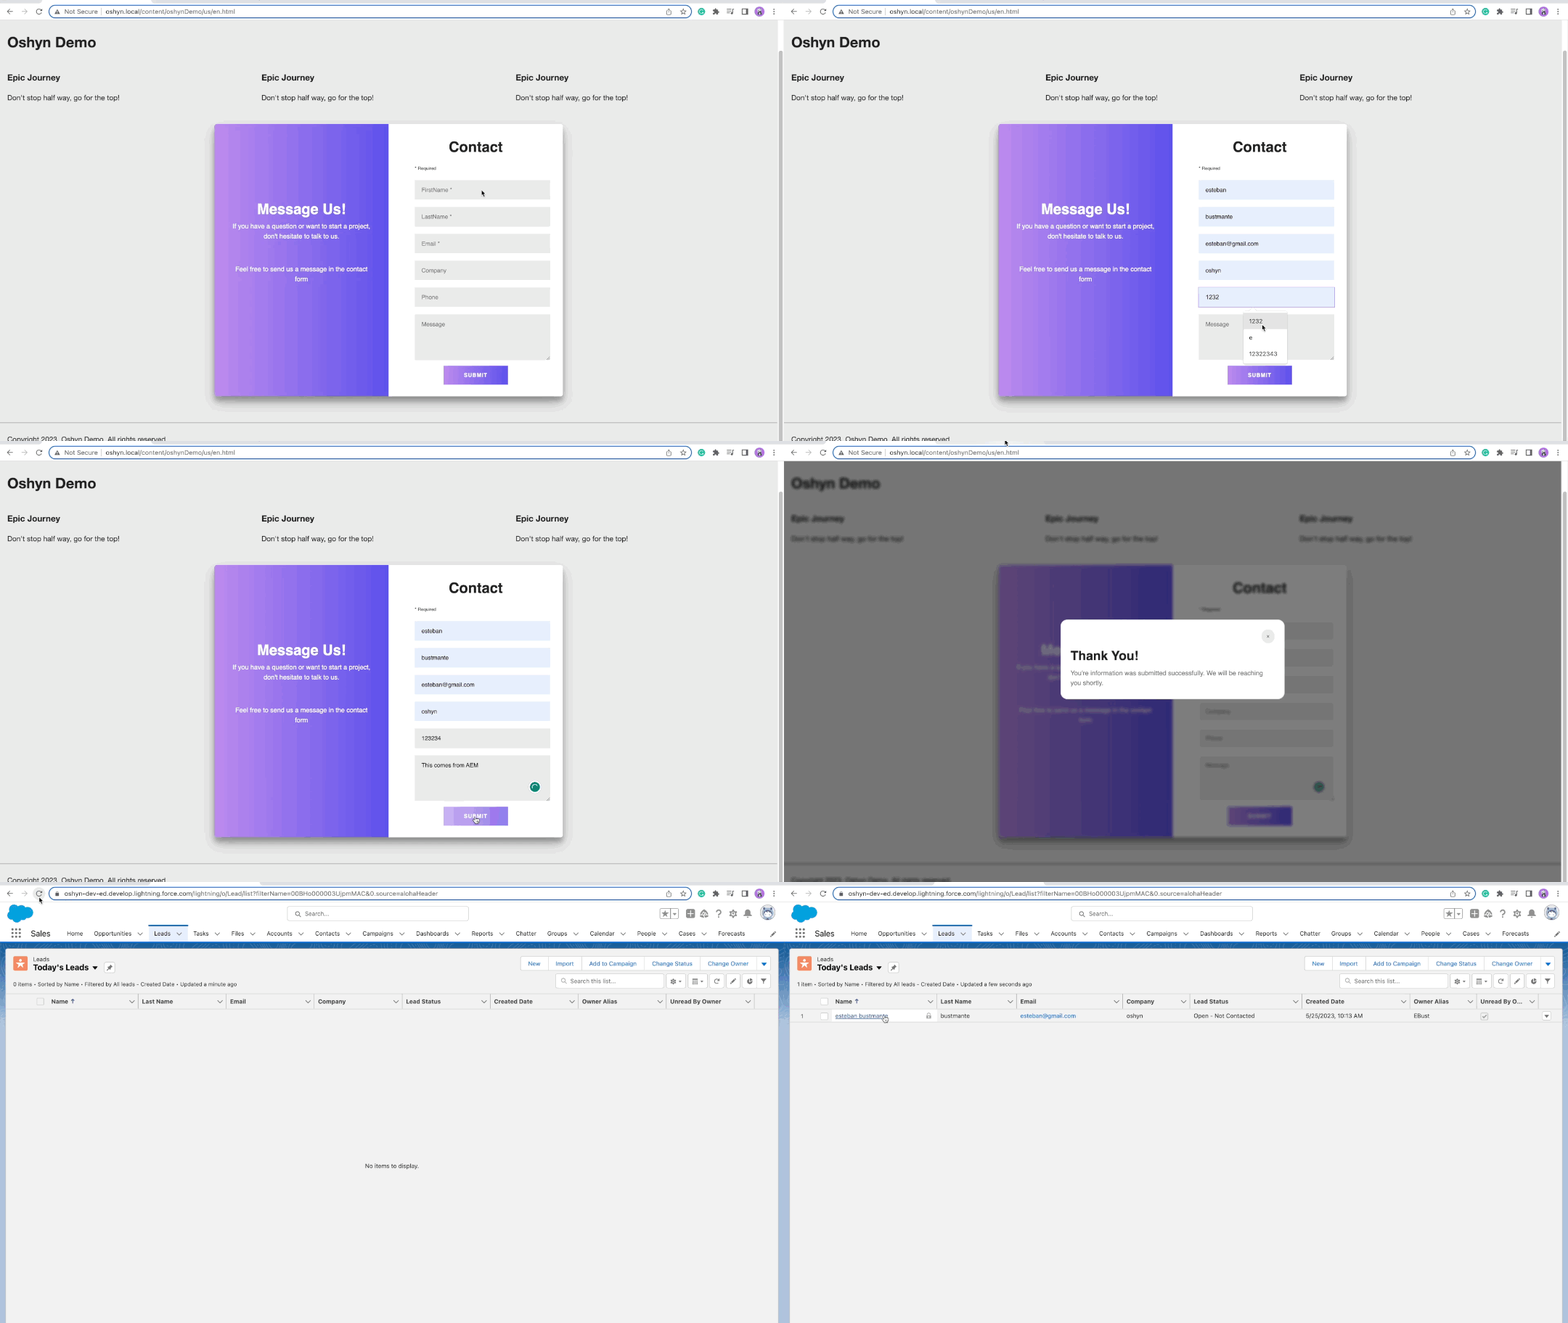
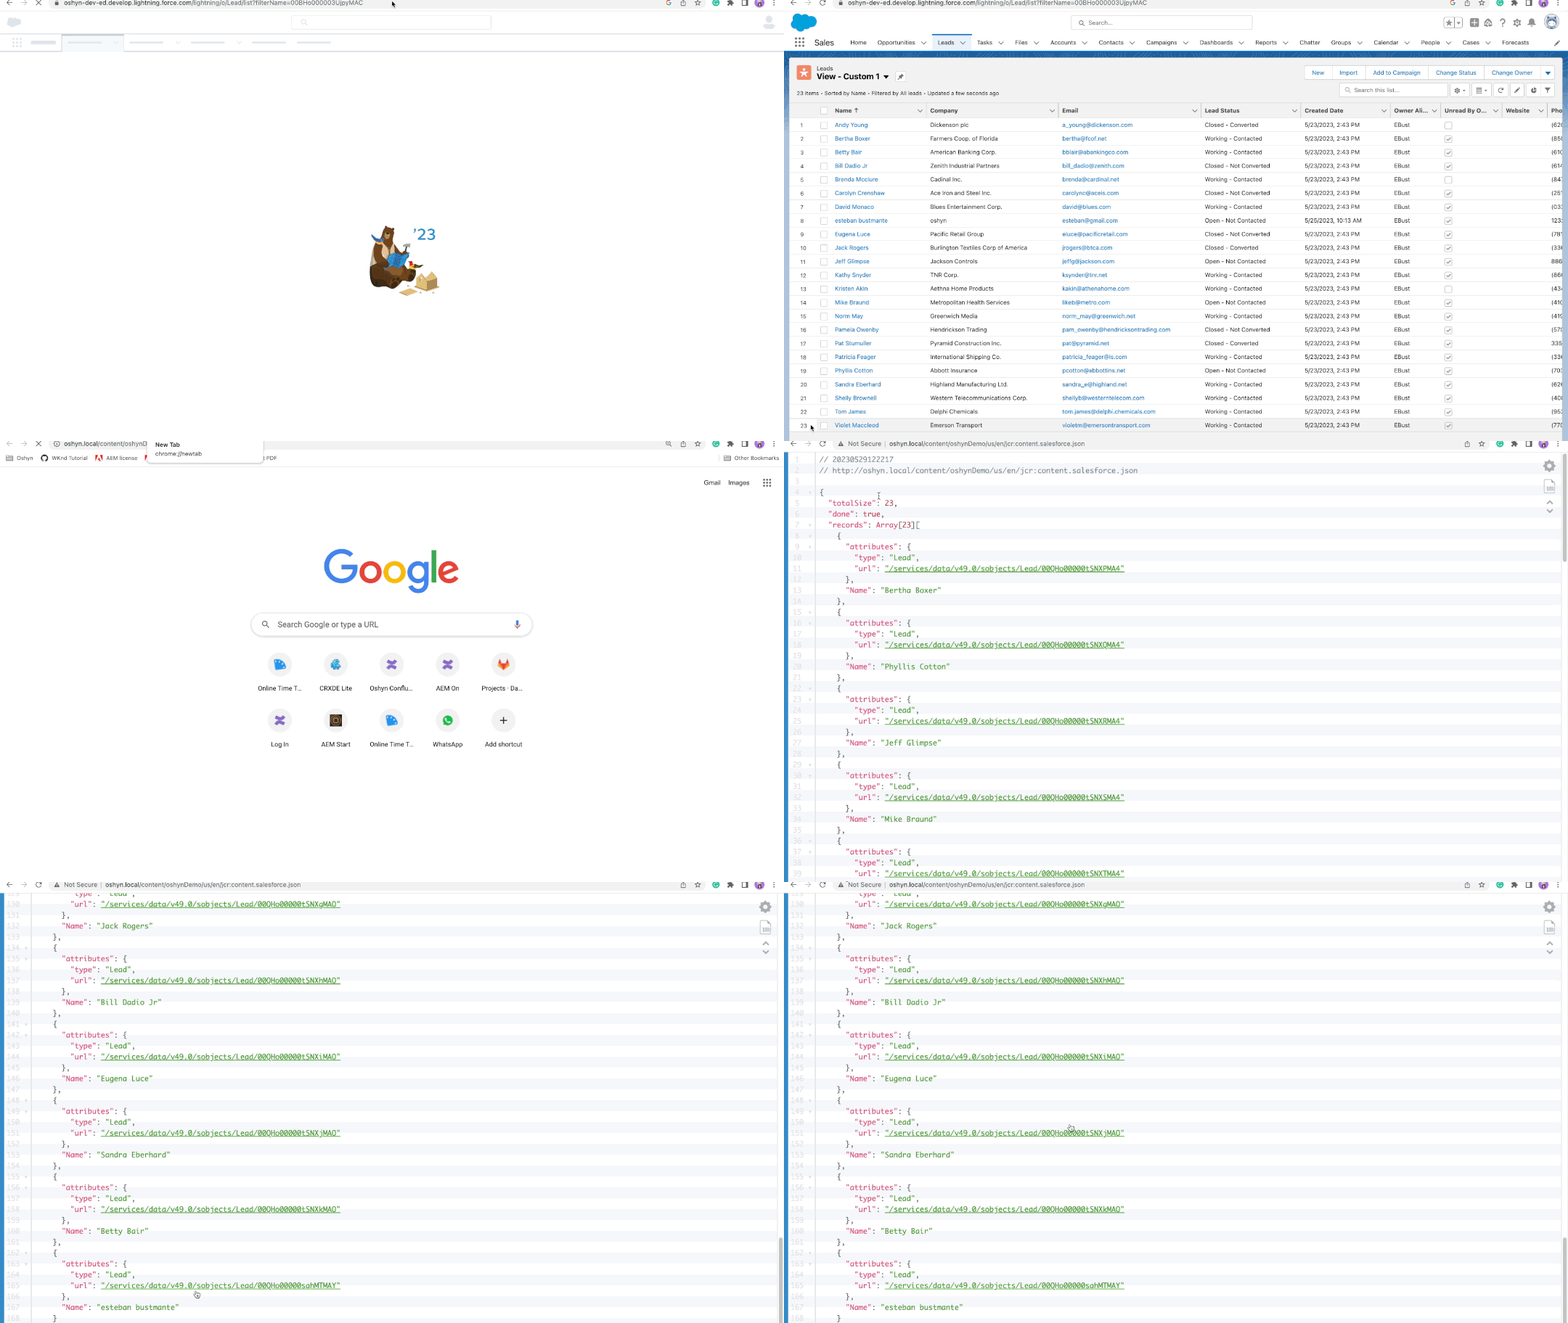
Below you can see all our pieces working together. Once the form is submitted, the information is stored in Salesforce.
Small Bonus
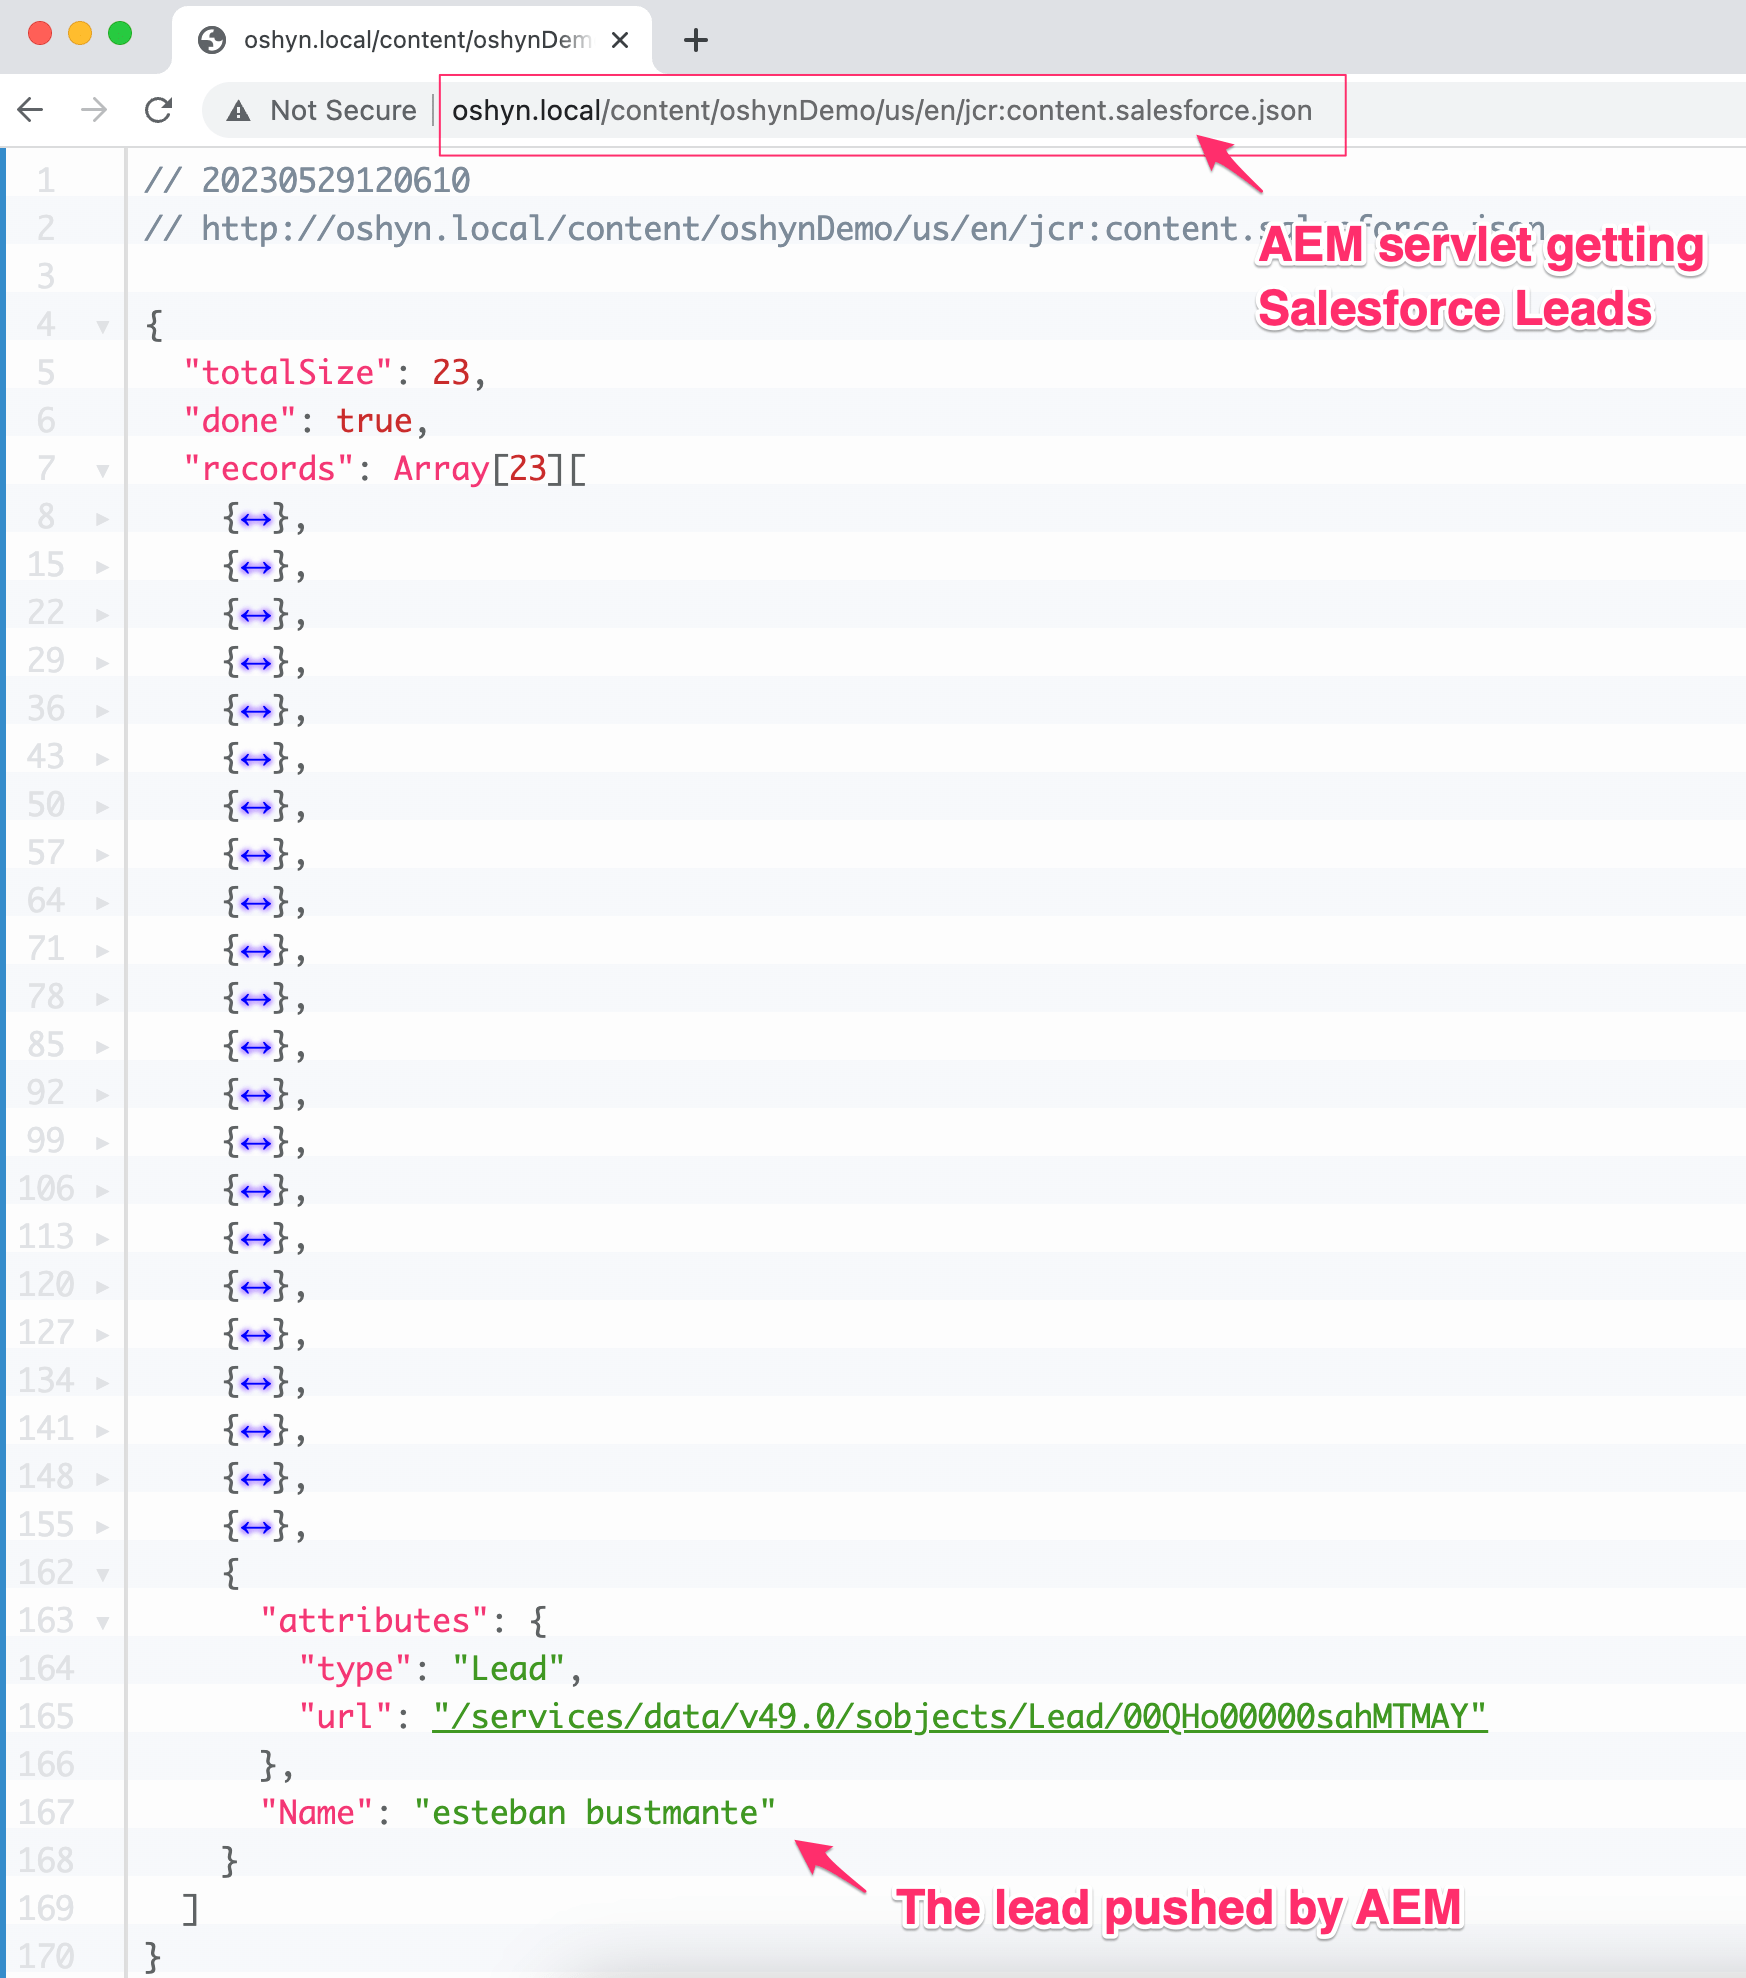
So far, we've discovered that OAuth is the secret sauce that allows us to communicate seamlessly with Salesforce. We can easily send data from AEM to Salesforce using POST requests, as well as fetch information from Salesforce and bring it back to AEM using GET requests. On top of the showcased "form" example, we've added a function to retrieve all the leads from Salesforce. We exposed a new GET method in the servlet and added an additional GET method in the OSGI service.
It is worth mentioning that Salesforce provides its own query language, Salesforce Object Query Language(SOQL). This query language is used to retrieve data from Salesforce's cloud-based databases. SOQL is similar to SQL (Structured Query Language), but it is specifically designed for querying and manipulating data within the Salesforce platform. We used SOQL in a small query for this bonus example.
...

//The below URL is specific to my salesforce account and data object version. Also note that i am using SOQL
private static final String GET_LEADS_URL = "https://oshyn-dev-ed.develop.my.salesforce.com/services/data/v49.0/query/?q=SELECT+name+from+Lead";

@Reference
private transient SalesforceService salesforceService;

...
...

protected void doGet(final SlingHttpServletRequest req, final SlingHttpServletResponse resp) throws ServletException, IOException {
    ...
    ...
    String token = getAccessToken();
    if (StringUtils.isNotBlank(token)) {
        dataResponse = salesforceService.getLeads(GET_LEADS_URL, token); //The new method that will add the authorization header
    }
    ...
    ...
    resp.getWriter().write(dataResponse);
}
The data exposed through the servlet:
Taking a closer look:
Wrapping Up
OAuth is a widely accepted and secure protocol that proves invaluable in system integration endeavors. By harnessing the capabilities of OAuth, we achieved a seamless integration of AEM with Salesforce. Adopting this straightforward approach opens up endless possibilities to accomplish complex tasks.
References
Recent Insights
-

-

Oshyn
Takeaways From Adobe Summit 2025
Agents, Creativity, and Vibrance
-

 Fernando Torres
JotForm
A Comprehensive Guide
-


