Using Both IIS and Tomcat


Oct 20, 2009
Sometimes in the IT world, it is necessary to combine more than one technology in order to get the job done or to get something to work more efficiently.
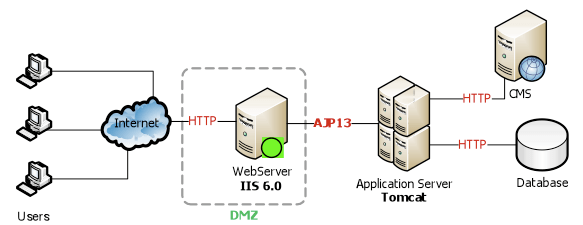
We recently needed to setup an environment where web pages that originated in a Tomcat server had to be delivered to the users through an IIS Web Server. To accomplish this task, a URL redirection tool was used. We set up the servers and proceeded to configure the redirection. Everything worked fine; communication between the two servers was done using the HTTP protocol.
We then decided to optimize the response times, so one of the aspects that needed our attention was, of course, the communication between the servers. We found out that using an Apache proprietary protocol instead of HTTP would provide a faster communication while requiring less processing. This protocol is called AJP13.

Basically this protocol uses a binary format instead of the traditional plain text format, thus providing better performance in sending and receiving TCP packages.
You can find a lot of documentation on the web, on how to set up this protocol to work with IIS. However, in this blog I am going to list the basic steps and a few other considerations I found out while doing the task for myself.
Requirements
The Tomcat redirector requires three entities:
isapi_redirect.dll: The IIS server plugin.
workers.properties: A file that describes the hosts and ports used by the workers (Tomcat processes).
uriworkermap.properties: A file that maps URL-Path patterns to workers.
Configuration
On the machine where IIS is running:
-
Download the ISAPI Redirect DLL binaries from the apache site. When downloading, choose the version of Windows that IIS is running on (either win32 or win64), and then choose the latest available JK version.
Note:
The file to download is named
isapi_redirect_x.x.x.dll, wherex.x.xis the version number. You will need to remove the version number from the DLL file (i.e. it needs to be namedisapi_redirect.dll). -
Place the DLL in a bin folder inside the installation directory. I recommend using
C:\Program Files\Apache Software Foundation\TomcatConnectors. -
Next you can follow the steps described in the section Configuring the ISAPI Redirector on the IIS How to page, which involve modifying the registry or, you can simply create a properties file with the information described bellow and add it to the bin directory where you placed the DLL.
# Configuration file for the Jakarta ISAPI Redirector

# The path to the ISAPI Redirector Extension, relative to the website
# This must be in a virtual directory with execute privileges
extension_uri=/jakarta/isapi_redirect.dll

# Full path to the workers.properties file
worker_file={JK_INSTALL}\conf\workers.properties

# Full path to the uriworkermap.properties file
worker_mount_file={JK_INSTALL}\conf\uriworkers.properties

# Full path to the log file for the ISAPI Redirector
log_file={JK_INSTALL}\logs\isapi_redirect.log

# Log level (debug, info, warn, error or trace)
log_level=debug
Note:
Replace the
{JK_INSTALL}in the example above with the path where you installed the binary file. -
Create a directory called conf (
C:\Program Files\Apache Software Foundation\TomcatConnectors\conf) in your installation directory. Download the filesuriworkermap.propertiesandworkers.propertiesto the directory you just created.You can find these files in the
confdirectory that comes in the mod_jk zip download file.You can start off by using the file
workers.properties.minimalwhich contains the basic configuration needed for the ISAPI DLL to work. If that's the case, don't forget to rename the file toworkers.properties.Example of a worker.properties file
#workers.properties
worker.list=worker1
worker.worker1.host=localhost
worker.worker1.port=8009
worker.worker1.type=ajp13
You can find more information on the worker.properties file here.
Example of an uriworkermap.properties file
#uriworkermap.properties
/WebApp1/*=worker1
You can find more information on the uriworkermap. properties file here.
-
Create a directory called logs (
C:\Program Files\Apache Software Foundation\TomcatConnectors\logs). This is where the logs associated with the isapi_redirect.dll execution will be placed. -
Open Control Panel, then Administrative Tools and open Internet Information Services.
-
Add an ISAPI Filter to IIS, as described below:
-
Right-click on Default Website (or the Website that you need to serve the.jsp pages), and click on Properties.
- Click the ISAPI Filters tab.
-
Check if there is a Filter that points to the
isapi_redirect.dllfile and that it is in the right location. If not, click Add and create one. Enter Jakarta as the Filter Name and enter the location of the isapi_redirect.dll file for the executable. -
Click Apply and then OK.
-
-
Create a virtual directory to access the
isapi_redirect.dllin IIS, as described below:-
Right-click on Default Website (or the Website that you need to serve the.jsp pages), choose New and then Virtual Directory.
-
Go through the creation wizard. Set the alias to be jakarta.
-
This must point to the directory in which the
isapi_redirect.dllis installed. -
Complete the wizard, making sure that you grant the Execute permission for the Virtual Directory by checking the corresponding checkbox.
-
-
Add the DLL as a Web Service Extension, as described below:
-
Right-click on Web Service Extensions and choose Add a new Web Service Extension.
-
Enter Jakarta for the extension name and then add the
isapi_redirect.dllfile to the required files. -
Select the extension status to Allowed check-box, and then click OK.
-
-
Restart IIS.
You are all done!
To test the configuration, you can use the examples provided by Tomcat, and try to hit this page from your browser: http://localhost/examples/jsp/index.html. Don't forget to add a new context in the uriworkermap.properties to handle this situation (i.e. /examples/*=worker1).
Recent Insights
-

-

Oshyn
-

Oshyn
Takeaways From Adobe Summit 2025
Agents, Creativity, and Vibrance
-

 Fernando Torres
JotForm
A Comprehensive Guide


