
Dec 05, 2019
All those marketing initiatives you run to attract visitors to your website are what we know as Campaigns. Implementing a campaign requires you to create content and/or a compelling offer up front, build the ad creative, and then often spend more on paid channels to amplify your message. This is why being able to measure the success of a campaign is fundamental for calculating your ROI (Return on Investment). Knowing what worked and what didn't will also allow you to better plan future efforts.
Besides the analysis of your campaign's performance, one the biggest benefits you get out of tracking your campaigns in Sitecore is the ability to use your visitor's interactions with your campaign content to personalize their journey through your website. For example, you can add Engagement Value points to the profile of a visitor who interacted with a specific campaign activity, or change the messaging of your landing page to match the content of an add that originated that visit.
That's the what and why, now let's do a deep dive into how. In a previous post, I explained how you can classify your Sitecore campaigns by defining a taxonomy. In this post, I will focus on walking you through the final steps in the process of launching a Sitecore campaign:
Create content
Build URL
Run campaign
Creating Campaign Activities
Once you've finished creating your taxonomy content items, you can create your campaign activities as described in Sitecore's documentation. Here is a summary of the steps:
On the Sitecore Launchpad, click Campaign Creator.

On the landing page, click Create campaign activity.

Enter a name, start and end dates for the campaign.
Make sure you use the fields on the Classification section to describe your campaign using the groups and facets defined on your taxonomy. In this example:
Author: Marketing Department
Target Audience: All Visitors
Channel: Email marketing
Campaign Group: Symposium
![]()
5. Save the campaign activity.
![]()
Building URLs
When you create a campaign, the Campaign Creator generates a campaign tracking code. Appending this code to any URL included in your campaign content (email, add, etc.) will allow Sitecore to track the website traffic generated by your campaign.
Start by copying the Campaign link from the Campaign execution section of your campaign activity.

- Add the Campaign link as a query string parameter to your campaign URL. Don't forget adding a question mark between the page URL and the campaign link parameter. For example: https://mysite.com/
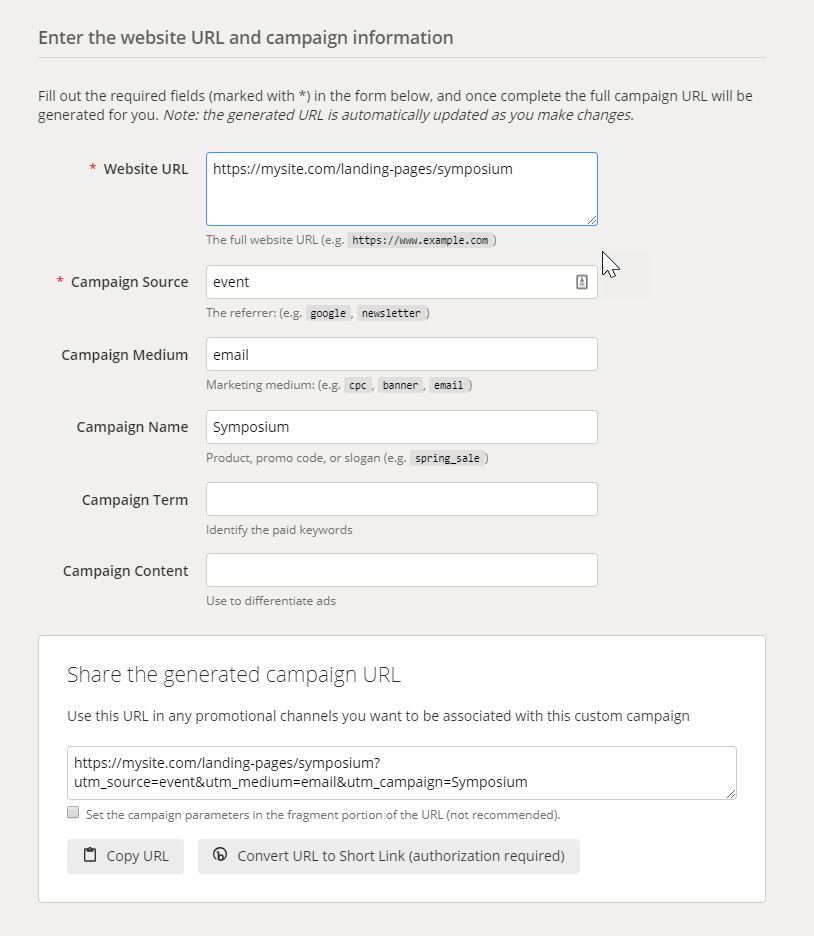
landing-pages/ symposium? sc_camp= 0728EE98FFA344CCBE7DC2F26140DA54 If you are using the Google Analytics Campaign URL Builder for generating URLs you can just append it to the URL provided by the tool with an ampersand separator. For example:
https://mysite.com/
landing-pages/ symposium? utm_source= event& utm_medium= email& utm_campaign= Symposium& sc_camp= 0728EE98FFA344CCBE7DC2F26140DA54 
Associating Campaign Activities to Landing Pages
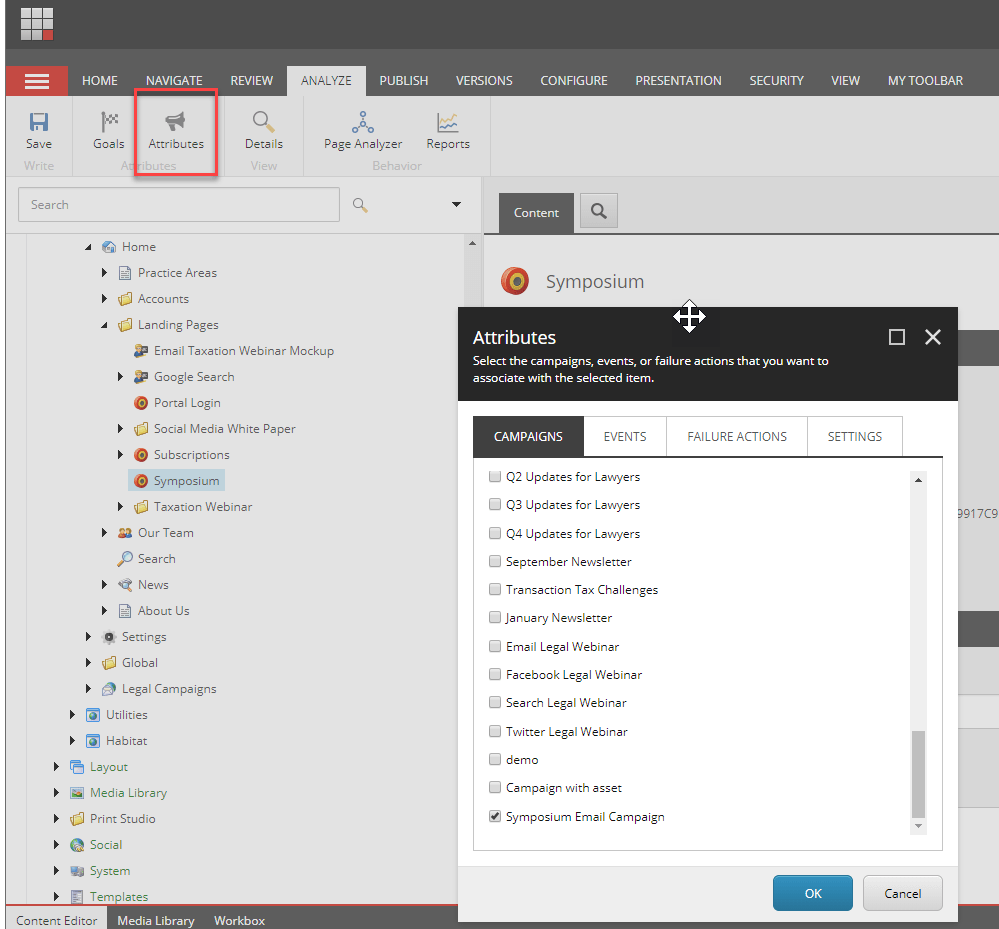
In Sitecore, it is possible to omit the URL parameter and yet, track your campaign interactions. In cases where you have a landing page for your campaign activity, Sitecore gives you the option of associating the two. This is particularly useful for the campaigns you run over offline channels such as direct-mail or billboards. Here an overview of the steps, check out the documentation for more details:
Navigate to the landing page, either on the content editor or the experience editor.
Click on Attributes from the Analyze tab and select the corresponding campaign activity from the list on the Campaigns tab.

Hit OK.
Creating a Redirect
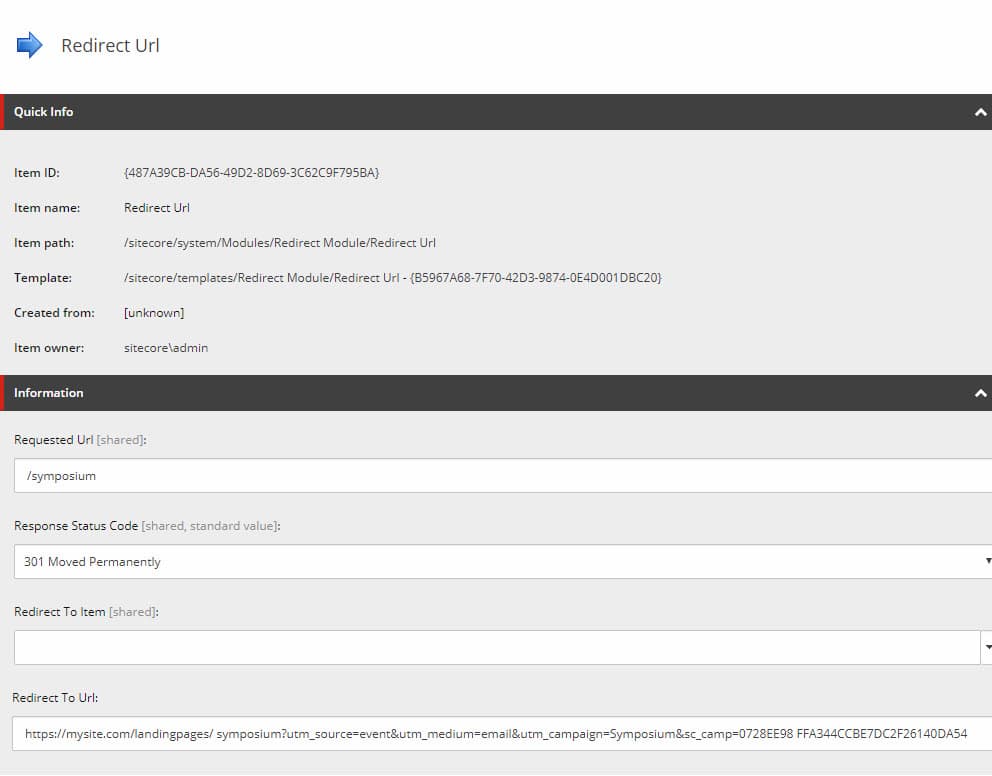
The other method to hide query string parameters from your campaign URLs is to create a redirect. A redirect also allows you to shorten your URLs and make them memorable. Out of the box, Sitecore doesn't provide a way to create redirects, but there are some modules available in the marketplace that you can ask a developer to install for you.
Navigate to the redirect module and create a new redirect rule.
Use the Requested Url field to define your short URL and enter the campaign parameterized URL in the Redirect to Url field.
Add your tracking parameters to the URL in the Redirect to Url field.

Save and publish your changes.
Remember to delete this redirect rule once your campaign finishes.
Running your Campaigns
Use the resulting campaign URL in your campaign content: banner ad, email, billboard, etc. It is always recommended to add a Goal to the campaign landing page and assign EV points to it. In that way, you can keep track of visitors who respond to your campaign. Wait for your visitor to participate, engage and convert, then check the result in Experience Analytics.
Results
After completing the previously described steps, your website visitors arriving via your campaigns will have their interactions recorded in xDB. You'll see your campaigns' info on the Acquisition tab reports: Campaigns, Groups and Campaign facets.
![]()
Campaigns Report
Campaigns that do not have a Campaign Group defined will be shown on the Experience Analytics reports grouped under the "unknown campaign group".
![]()
Campaign Groups Report
The definition of the campaign attribute Channel will feed Channels reports.
![]()
Online Channel Report
Assets associated with campaigns will be counted in the Assets report.
![]()
Assets Subtab
Paid overview reports will also be populated based on the campaigns you define (if any) to keep track of your paid keywords.
![]()
Paid Overview Subtab
Final Thoughts
Tracking your marketing campaigns in Sitecore provides you the insights you need to:
evaluate campaigns performance and plan future campaigns
fuel your personalization strategies
It is possible to track your campaigns in Sitecore and Google Analytics at the same time.
Using Sitecore Campaign Creator is a low effort but high-value activity that you should incorporate to your marketing kit right away.


