
Sitecore Search & Coveo: Skinning Results


Jun 25, 2012
Coveo Enterprise Search for Sitecore offers you a rich search interface for faceted search. It also allows you to customize all the fields you get in your search results without programming or CSS work, as shown in the image:
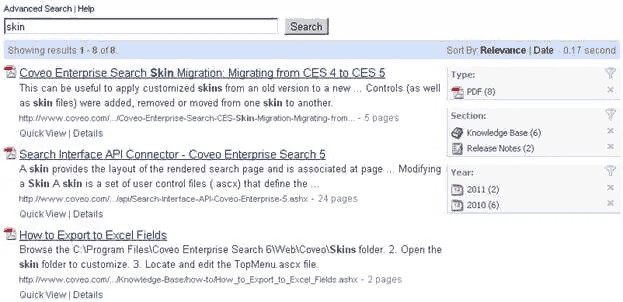
But the style offered may not match your site, or it could be the case you are using some third party user controls and you require using them in your advanced search and your search results. For these cases, Coveo has created Skins. A skin is a group of .ascx files that allows you to change your search controls.
Before you can create your own skin, it is necessary to create a “Search Hub”; a search hub will contain many “Search Interfaces”. In order to achieve this, you need to open the “Interface Editor” in your Coveo server:
http://MyCoveoServer:8080/SearchAdmin/Interfaces/Features_General.aspx
In Current Hub, select “Create a New Search Hub”:
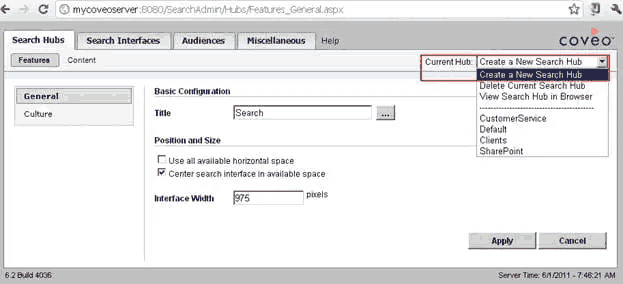
Enter a name and then click “Create”:

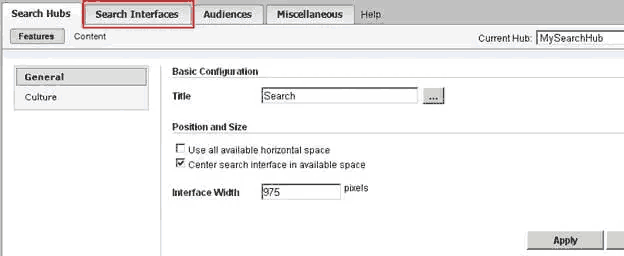
Next, you need to create the search interface, click on Search Interfaces:
In Current Interface, select “Create a New Interface”:
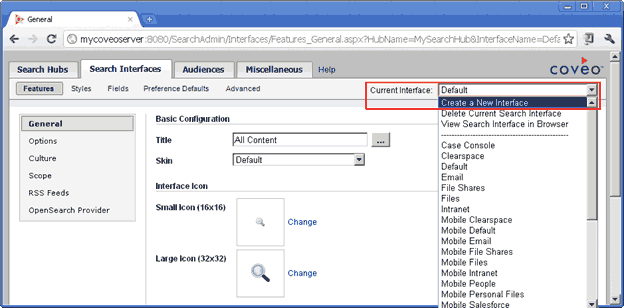
Enter a name and click Create:

Then, you have to create the controls for the skin, in order to do this, in your coveo server, go to the location: C:\Program Files\Coveo Enterprise Search 6\Web\Coveo\Skins
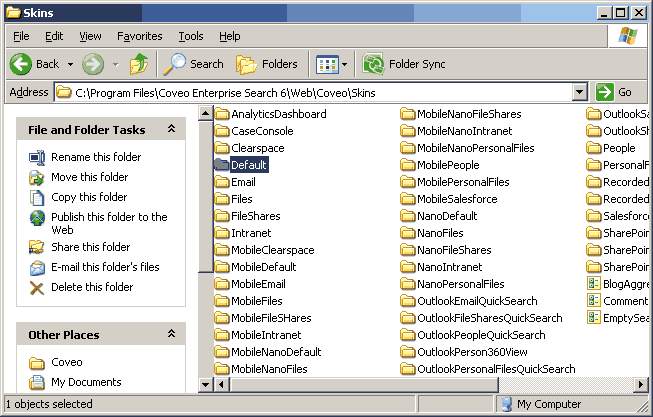
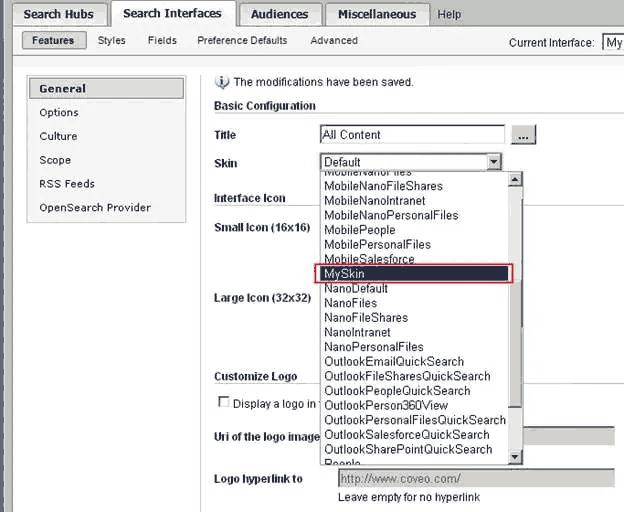
It is recommended to take the Default skin as a base for all your changes, so copy the folder named “Default” and give a name for your skin. Return to the Interface Editor, refresh the page, and select your new Skin, and finally click Apply:
Return to the Search Hubs page, click on Content, select all existing search interfaces and the click on Remove Selection. In the confirmation, click Yes:

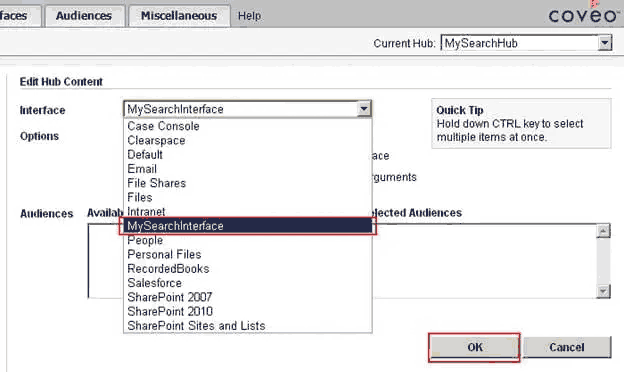
Then click on Add in order to select your search interface:

Select your search interface and click OK:
Once you have created your new Base Skin (along with the Search Hub and Search Interface), it is then time to add the Coveo controls into your sitecore website. First you need to copy Coveo.CNL.Web.dll and Coveo.CNL.Web.Search.dll to your website's bin folder. Then you have to add the code necessary in your web.config to tell sitecore which Coveo instance should use:
<coveoEnterpriseSearch>
   <server hostname="localhost" impersonate="False" mirrorName="default" port="52800"/>
</coveoEnterpriseSearch>
Now you can add Coveo’s search controls to your sitecore pages, you add the reference:
<%@ Register TagPrefix=“ces” Namespace=“Coveo.CES.Web.Search.Controls” Assembly=“Coveo.CES.Web.Search, Version=6.0.0.0, Culture=neutral, PublicKeyToken=44110d16825221f2” %>
And then you add the user control (a search hub):
<ces:SearchHub ID=“MyCoveoSearchControl” Name=“MySearchHub” runat=“server” />
This will show the default search interface in Sitecore:

And the default search results:

Now that we learned how to create the new skin, I will show the Coveo Enterprise Search Result title in a Sitecore CMS page, but it will have a specified maximum length, it will be a link to the result, and we will also show a custom field in italics. First, you have to create a new user control. Open Visual Studio and create a new ASP.Net Server Control Project:

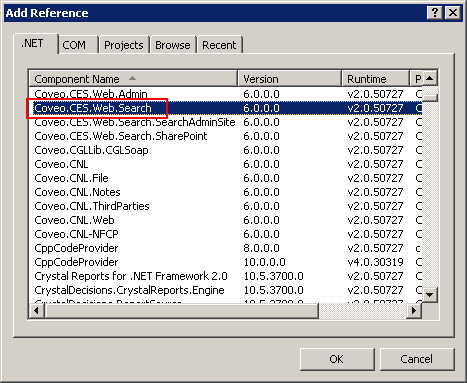
Then add a reference to Coveo.CES.Web.Search it will allow you to access search results and render them:
Add a new class, make it public and it should inherit from the Coveo class BoundToResult (under the namespace Coveo.CES.Web.Search.Controls)
using Coveo.CES.Web.Search.Controls;

namespace MyCustomSkinControls
{
    public class MyResultControl : BoundToResult
    {
    }
}
We add the property to hold the maximum length of the field:
private int m_Length;

public String Length
{
       get { return m_Length.ToString(); }
       set { m_Length = Int32.Parse(value); }
}
Its constructor will call the base class with the value “a”, in order to create it as a hyperlink:
public MyResultControl() : base("a")
{
}
Then it is time to override the method Render:
protected override void Render(HtmlTextWriter p_Writer)
{
//Get the value for the tile
string title = Result.ResultObject.Title;

//Get the value of a custom field
string author = Result.ResultObject.GetField("@rbauthor").ToString();

//Check the lenght of the values
title = this.CheckLength(title);
author = this.CheckLength(author);

//Add the href part for the result link
p_Writer.AddAttribute("href",Result.ResultObject.PrintableUri);
RenderBeginTag(p_Writer);
//You can also put a class
p_Writer.AddAttribute("class", "ResultTitle");
p_Writer.RenderBeginTag("p");
p_Writer.AddStyleAttribute("font-size", "15px");
                    p_Writer.AddStyleAttribute("font-weight", "bold");
                    p_Writer.RenderBeginTag("span");
p_Writer.Write(title);
                    p_Writer.RenderEndTag();
p_Writer.WriteBreak();
//The author will be on italics
p_Writer.RenderBeginTag("i");
p_Writer.Write("Author: ");
p_Writer.Write(author);
p_Writer.RenderEndTag();
p_Writer.RenderEndTag();
RenderEndTag(p_Writer);
}

private string CheckLength(string p_Field)
{
if (p_Field != null)
{
p_Field = p_Field.Trim();
if (p_Field.Length > this.m_Length)
{
p_Field = p_Field.Substring(0, m_Length - 3).Trim() + "...";
}
}

return p_Field;
}
Now we add the control we just created and use it in our skin. On the Coveo server, open the file: C:\Program Files\Coveo Enterprise Search 6\Web\Coveo\Skins\MySkin\ResultTemplate.ascx
This file contains the html and the user controls for every single search result. Inside this code, we have to add our user control. Register the control with:
<%@ Register TagPrefix="custom" Namespace="MyCustomSkinControls" Assembly="MyCustomSkinControls" %>
Next, remove all the existing code and just add:
<custom:MyResultControl id="result" Length="20" runat="server" />
Then you need to copy the DLL to the website’s bin folder. And now you have changed your search results skin:

Related Insights
-

-

-

 Fernando Torres
Tailwind CSS in Modern Web Development
Integration with AEM, Sitecore, and Optimizely
-


