
Installing and Using Lucene Search Module in Sitecore


Jun 25, 2012
Lucene is an open source search engine (supported by the Apache Software Foundation) used in Sitecore for indexing and searching the contents of a website. Sitecore implements a wrapper for the Lucene engine which has its own API. The original API (Lucene.Net) and the Sitecore API (Sitecore.Search) are both accessible to developers that want to extend their indexing and search capabilities[1].
The Lucene Search module is taken from the Sitecore Starter Kit and made into a separate module [2]. You can download the module from the TRAC website. Because it is a part of the Starter Kit, it also uses the Shared Source License.
Installing the Module
To install the Lucene Search module you follow the same procedure as installing any other package in Sitecore.
Goto Sitecore > Development Tools > Installation Wizard
Browse to the location where you downloaded LuceneSearch-1.1.zip file
Follow the instructions given on the wizard.
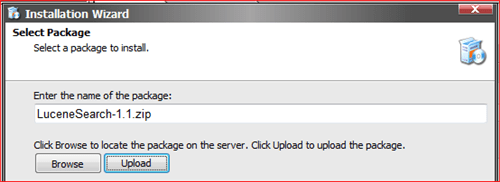
When you install this module the following files and items are added to your installation:
Files
/bin/LuceneSearch.dll
/images/search.gif
/LuceneSearch.css
/sitecore modules/LuceneSearch/
/sitecore modules/LuceneSearch/CommonText.cs
/sitecore modules/LuceneSearch/LuceneSearchBox.ascx
/sitecore modules/LuceneSearch/LuceneSearchBox.ascx.cs
/sitecore modules/LuceneSearch/LuceneSearchBox.ascx.designer.cs
/sitecore modules/LuceneSearch/LuceneSearchResults.ascx
/sitecore modules/LuceneSearch/LuceneSearchResults.ascx.cs
/sitecore modules/LuceneSearch/LuceneSearchResults.ascx.designer.cs
/sitecore modules/LuceneSearch/SearchManager.cs
Items
/sitecore/Content/Settings/Common Text |
Items that allow you to customize the search behavior and the messages presented to the user. |
/sitecore/Layout/Sublayouts/LuceneSearch |
The two sub layouts needed to provide search functionality on your site. |
/sitecore/Content/Home/Standard_Items |
Item used to display the search results. |
/sitecore/Templates/Starter Kit/Meta-Data |
Template for the items in the Common Text folder |
When you install the Lucene Search module you get two sub layouts LuceneSearchBox and LuceneSearchResults that you should place on your website. LuceneSearchBox is the search box that you can place somewhere on the top of your page and then the LuceneSearchResults sublayout is where the search results are displayed.
The LuceneSearchBox redirects to the content item /sitecore/Content/Home/Standard_Items/Search_Results to display search hits.
If you want to use the default styling, remember to add a reference to the LuceneSearch stylesheet on the same layout that you placed the search results sub layout.
Creating the Index
Sitecore maintains indexes by scanning items in Sitecore databases. Every time you update, create or delete an item Sitecore runs a job that updates the indexes. The process is usually complete by the time you have saved or published an item.
The web database does not have a search index by default. So you will need to create one to enable search functionality on your published site.
Indexes are created in the web.config file under the node /sitecore/search/configuration/indexes.
The following shows a sample index configuration:
<index
id=“MySearchIndex”
      type=“Sitecore.Search.Index, Sitecore.Kernel”>
    <param
desc=“name”>$(id)</param>
    <param
desc=“folder”>__mysearchindex</param>
    <Analyzer
ref=“search/analyzer”/>
    <locations
hint=“list:AddCrawler”>
        <customindex
type=“Sitecore.Search.Crawlers.DatabaseCrawler, Sitecore.Kernel”>
            <Database>web</Database>
            <Tags>My Custom Tag</Tags>
            <Root>/sitecore/content/Home</Root>
            <include
hint=“list:IncludeTemplate”>
                <template>{TemplateId #1}</template>
                <template>{TemplateId #2}</template>
                …
                <template>{TemplateId #n}</template>
            </include>
        </customindex>
    </locations>
</index>
Each index you defined has its own unique identifier provided in the ID attribute of the INDEX element.
The first two parameters describe the index name and folder where it should be stored.
The <Analyzer> element indicates the analyzer that should be used.
The <locations> element defines the locations for the index. It's possible to have multiple locations for one index. It's even possible to have content from different databases in the same index.
Every child of the locations node has its own configuration with the following options:
<Database> |
Specify which database you want to index. |
<Tags> |
You can attach a string tag to items from this location making it possible to filter or categorize results during a search. |
<Root> |
Specify the root node of the content tree to be included into the index. The indexing crawler will index content below this location. |
<include> |
In this section, it’s possible to add templates that should be included/excluded from the index. |
Additionally, the indexes in Sitecore use the History.Engine mechanism to create or update the index when an item has been created or updated. In order to enable this for the web database, you will need to add the following lines to the web database defined in the /sitecore/databases/ section on the web.config file.
<Engines.HistoryEngine.Storage>
    <obj type="Sitecore.Data.$(database).$(database)HistoryStorage, Sitecore.Kernel">
        <param connectionStringName="$(id)"/>
        <EntryLifeTime>30.00:00:00</EntryLifeTime>
    </obj>
</Engines.HistoryEngine.Storage>
Using the Module
Now that you know how to install the Lucene Search Module into your Sitecore project, you can use the module to perform search on your site.
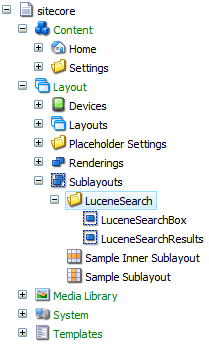
After you have installed the Lucene Search module, you will see two sub layouts in the content tree: LuceneSearchBox and LuceneSearchResults.
1. Adding the Search Box
In order to use the Lucene Search module, you must first add the Search Box to your site. It is recommended to add it to the main layout or to a sub layout that is present along all the pages of the site. This insures that search would be available from everywhere.
There are several ways to add a sub layout in Sitecore:
- The easiest and most common is using the Page Editor. However, some configuration needs to be done on the CMS (
/sitecore/Layout/Placeholder Settings) in order for this to work on the default empty site. For more information on this, please refer to Sitecore’s Presentation Component Reference. -
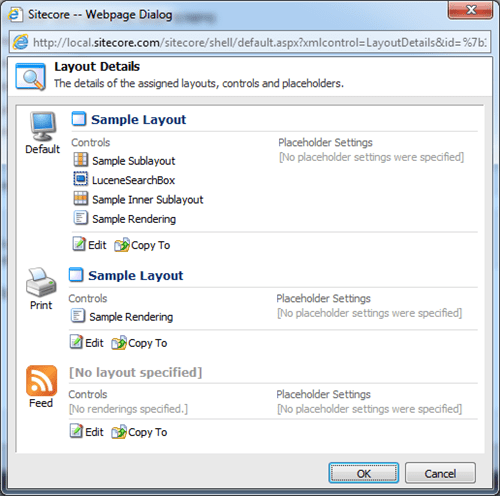
Another approach is adding the sub layout to a template using the Presentation > Layout Details wizard as shown in the screen below.
-
Finally, you can use some mark-up code to add the LuceneSearchBox sub layout. This can be done in the main layout (.aspx) or a specific sub layout (.ascx). Simply add the following code to the corresponding page:
<sc:Sublayout runat=“server”Path=“~/sitecore modules/LuceneSearch/LuceneSearchBox.ascx”/>
In any case the LuceneSearchBox sub layout will be displayed on the site as shown below.

Once added, the LuceneSearchBox accepts one or more search terms in the input area, and when the button is clicked or the <ENTER> key is pressed it redirects to the /sitecore/Content/Home/Standard_Items/Search_Results item.
This item will show the results found, but it needs to have the LuceneSearchResults sub layout assigned so it works properly. This is shown in the next step.
2. Adding the Results Page
Go to /sitecore/Content/Home/Standard_Items/Search_Results and using the Presentation > Layout Details wizard add the LuceneSearchResults sublayout to the item; then publish the page.
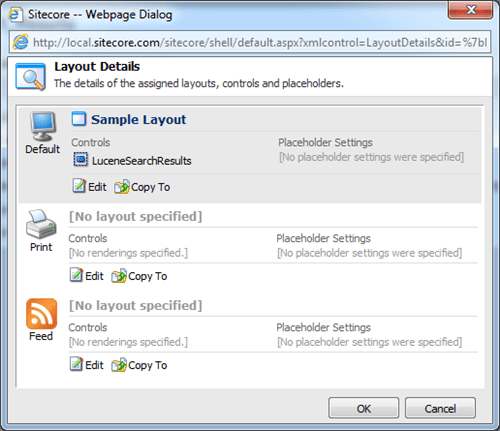
The results page will show the items found in the following format:
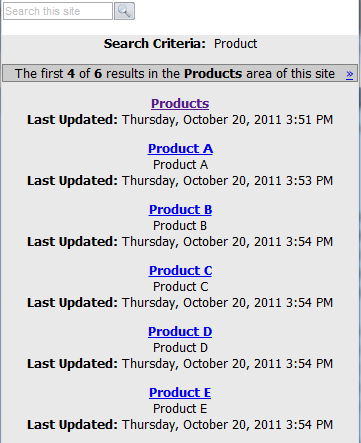
If you want to use the default styling, remember to add a reference to the LuceneSearch style sheet on the layout you place the search results sub layout on.
How to customize the Lucene Search Module
Lucene Search module offers a place where you customize some of the search behavior and messages shown in the site. Because these setting are stored as text, you can use them to add another language if necessary.
You will find these items under /sitecore/Content/Settings/Common Text.
| Name | Description |
|---|---|
| Search | Text shown in the search box. |
| Search Category Full Title | This string is used as the category header on the search results page. The header will display text like: Results 1 to 43 in the Products area of this site {0} - Total number of results {1} - Site area (corresponds to the site sections) |
| Search Category Partial Title | This string is used as the category header on the search results page. The header will display text like: The first 3 of 43 results in the Products area of this site {0} - Number of results shown {1} - Total number of results {2} - Site area (corresponds to the site sections) |
| Search Criteria | Label shown before the search criteria on the Search Results page. |
| Search Index | The name of the index used for searching. Do not change unless you are sure that you know what you are doing. The search feature uses the system index associated with the master database because the starter kit sites run in "Live Mode". If you change the site to support a separate web database, you must create an associated web database index and specify its name above in order to support search. |
| Search Last Updated | Label shown on the Search Results page for the Last Updated date. |
| Search Max Initial Results | Indicates the maximum number of results per category to show on the initial search results page. |
| Search No Criteria | Warning given when users click the search button without providing any search criteria. |
| Search No Results | Message provided when search criteria returns an empty result set. |
Additionally, you can go into the Custom Controls code or one of the classes that were installed and change the code to fit your requirements.
REFERENCES
Recent Insights
-

-

-

 Fernando Torres
Tailwind CSS in Modern Web Development
Integration with AEM, Sitecore, and Optimizely
-


