Enterprise EPiServer: Active Directory Integration


Nov 09, 2011
This topic has two different approaches based on the EPiServer CMS product version. The last CMS version R2 has already integrated the configuration provider, under EPiServer.Security, so in this version the Active Directory (AD) integration is really simple. In the other hand, for previous versions, we have to do a manual configuration, in this case we have to download the source code from the EPiServer community website.
Note: A difference of Sitecore AD Integration and the EPiServer’s R2 integration is that this functionality is not part of the main installation therefore you have to download the Sitecore CMS Active Directory module that provides the integration of AD domain users and groups available into Sitecore CMS as Sitecore users and Sitecore roles. Sitecore's Active Directory Module
In this post I will focus on the R2 CMS version, and finally, I will talk about another approach to manage users and groups and their access right within the admin control panel.
Requirements:
We need an Active Directory domain and a web server with EPiServer CMS 5. This web server doesn’t have to be included as a member of the AD domain but all the integration requires an AD user with permissions to communicate with the AD domain controller.
Integration with EPiServer CMS 5 R2
Basically this configuration requires some changes on the web.config file, the first change is under the membership section, the second change is under roleManager section and the last one is related to the authorizations depending on each location (CMS modes):
membership provider section:
<membership defaultProvider="ActiveDirectoryMembershipProvider" userIsOnlineTimeWindow="10">
<providers>
<clear />

<add name="ActiveDirectoryMembershipProvider" type="System.Web.Security.ActiveDirectoryMembershipProvider, System.Web, Version=2.0.0.0,    Culture=neutral, PublicKeyToken=b03f5f7f11d50a3a"
connectionStringName="ActiveDirectoryProviderConnection"
connectionUsername=""
connectionPassword=""
enableSearchMethods="true" attributeMapUsername="sAMAccountName" />

</provider>
<membership>
You just have to complete the connectionUsername="" and connectionPassword="" using a user account with appropriate permissions to read all properties, read groups names, read groups attributes, members and memberOf. The connectionStringName should match with the server path and certain attributes according to your Active Directory server. The basic structure of this connection string has the following format:
<add name="ActiveDirectoryProviderConnection" connectionString="LDAP://ServerURL/DC=domain,DC=COM"/>
After adding this configuration, you have to define the membership attribute defaultProvider=”ActiveDirectoryMembershipProvider”
In this example we use the attribute attributeMapUsername="sAMAccountName" to authenticate users using the Windows Logon Name, so you can switch the type of username changing this attribute value. It is very important to consider that if you change this value after you had assigned any access right permission, ALL the profile information with the users’ specific security configuration will be deleted.
roleManager provider section:
<roleManager enabled="true" cacheRolesInCookie="true" defaultProvider="ActiveDirectoryRoleProvider">
<providers>
<clear />

<add name="ActiveDirectoryRoleProvider"
type="EPiServer.Security.ActiveDirectoryRoleProvider"
connectionStringName="ActiveDirectoryProviderConnection"
connectionUsername=""
connectionPassword=""
attributeMapUsername="sAMAccountName"/>

</providers>
</roleManager>
Here you can see that the rolaManager provider configuration is similar than the membership provider configuration, in a common case you can use the same connection string and user account in both sections but you have the option to configure the roleManager provider using a different Active Directory configuration as well.
3. Configure Basic Authorizations:
In order to set up authorizations (using the default installation settings) you have defined three main areas in the web.config:
<location path="cms">
<location path="cms/admin">
<location path="WebServices">
The cms and cms/admin locations allow users to access to the CMS Edit mode and the CMS Admin mode, the last one allows users to consume the provided CMS webservices
Now that you have configured the membership and roleManager providers to communicate with Active Directory you need to assign permissions to the set of Active Directory groups for each location, this change has to be applied configuration file as well. Each location section contains an authorization section; you just have to list the AD group names according to your authorization settings and your business rules
<authorization>
<allow roles="ADGRoupName1, ADGRoupName2, Employees "/>
<deny users="*"/>
</authorization>
Now we can see that the user account used in the membership and roleManager configuration, previously explained, requires permissions to read the memberOf attribute of the Active Directory authenticated users.
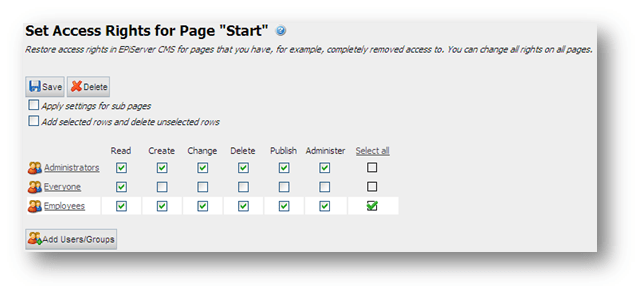
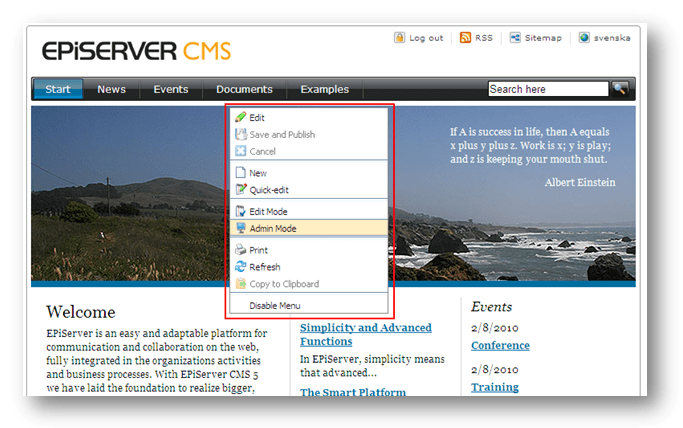
This configuration allows users, that are members of the appropriate AD group, to get access to a CMS location but you may want to configure within the Admin Mode control panel more detailed access rights to each AD group as follows:
Basic Authorization: (only Read Permission)
Detailed Authorization: (Read, Create, Change, Delete, Publish and Administer permissions)
To set up detailed access rights to AD groups you have to:
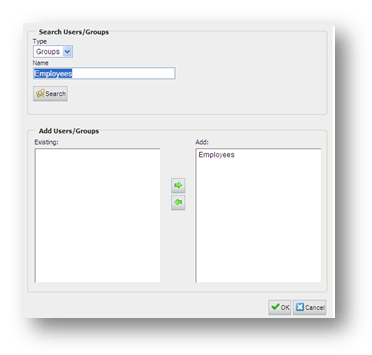
1. Add the AD group:
2. Set access rights for selected pages
Configuring a Multiplexing Role Provider
With the AD integration configuration you have only READ access permission to list and get properties of users and groups of your AD server; in this case you cannot create / delete / edit users and groups within the Admin Mode control panel. In order to modify the list of users and groups you can use another approach, you can use the MultiplexingRoleProvider as the DefaultProvider in the web.config file:
<add name="MultiplexingRoleProvider" type="EPiServer.Security.MultiplexingRoleProvider, EPiServer" provider1="ActiveDirectoryRoleProvider" provider2="SqlServerRoleProvider " providerMap1="ActiveDirectoryMembershipProvider" providerMap2="SqlServermembershipProvider " />
With the MultiplexingRoleProvider configuration the authentication process follows the order of the attribute provider# (provider1, provider2,…) trying to authenticate users. This approach allows you to create and delete groups and users within the Admin control panel. Another case to integrate this configuration is when you have more than one source of users like an Active Directory and users from an MS SQLServer database.
Recent Insights
-

-

-

 Fernando Torres
Tailwind CSS in Modern Web Development
Integration with AEM, Sitecore, and Optimizely
-


