
Apr 21, 2022
Sitecore workflows make the content publishing process predictable and repetitive so you always know the path it will take and all the steps that connect writing and publishing content on Sitecore.
Sitecore workflows go beyond helping editors approve content before publishing. They enable you to integrate content services and approve things before they get published, empowering your content teams, increasing your content quality, and helping them become more productive.
In this article, I'll show you how to set up a Sitecore workflow for Content Editors and provide an in-depth overview that covers Sitecore workflow implementation, how content editors can use workflows, and how to use Sitecore’s Workbox.
What Is a Workflow?
A workflow is a series of predefined steps that reflect the processes and procedures for creating web content in a platform, in this case, Sitecore.
A business process workflow enables companies to handle an unlimited number of items that are going through them. Workflows give you control over the content approval and publishing process, ensuring that only approved content is published.
Workflows are normally implemented by developers. However, it is useful for content authors to understand how workflows are constructed and implemented.

Parts of a Sitecore Workflow
Sitecore workflows allow businesses to put in place a content creation and approval process based on their specific business requirements.
A workflow has the following parts:
-
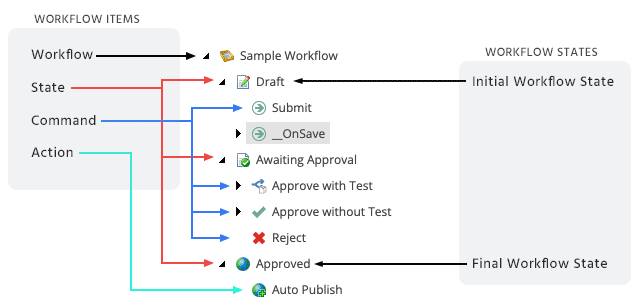
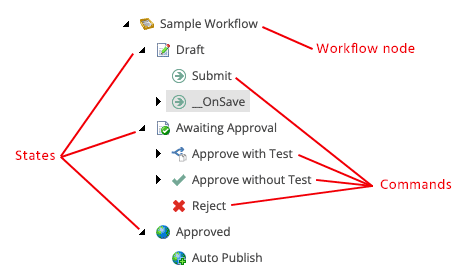
Workflow Node: The main item that contains all of the sub items that make up the workflow.
-
Workflow States: The different stages in your content creation process.
-
Workflow Commands: The actions that must be performed to move the content items from one workflow state to another.
-
Workflow Actions: Actions that are automatically performed on the content items when they are in particular workflow states or when particular workflow commands are executed.

After the workflow has been defined, the developer specifies which item templates are subject to the workflow.
What is the Sitecore Workbox?
In the Workbox, you can see the editing history of items in the workflow, each item’s workflow state, and the number of items in each workflow state and compare different versions of the same item.

Using Workflows in Sitecore
In the example we prepared for this demo, the workflow states correspond to Draft, Awaiting Approval, Approved and content items must go through all these states before they are published on the website.
In Sitecore, you can implement any number of different workflows. Each workflow must contain at least two workflow states — one that has been defined as the initial workflow state (Draft) and one that has been defined as the final workflow state (Approved). It’s important to note that content items can only be published when they are in the final workflow state.
Note:We are logged in as an admin, so let’s log off and log in using an editor account.
When you create a new content item, it is automatically placed in the initial workflow state. The content item remains in the initial workflow state until you use a workflow command to move it to another workflow state.
If you edit an existing content item that is subject to a workflow, Sitecore creates a new version of this content item and places it in the initial workflow state.
If you edit this content item again later, you edit the version that is in the workflow unless you specify that you want to edit another version.
Keep in mind that content items that are edited by administrators are not subject to workflows.
Content items can be moved from the page editor or the Content Editor – here I’ll show you how to move content items in the Content Editor.
When you have finished editing the content item, you can send it to the next workflow state.
To send a content item to the next workflow state:
-
In the Content Editor, open the content item that you are working on.
-
Click the Review tab.
As you can see, the Workflow group displays a workflow command — Submit. This is the only workflow command that you can apply to the current content item in its present workflow state.
Furthermore, the content item also displays a message informing you that this version of the item cannot be published because it is not in the final workflow step.
-
Click Submit to send the content item to the next workflow state. Sitecore displays a dialog box for you to enter a comment.
-
Enter a comment and then the content item is moved to the next workflow state.
The workflow commands that are available in the Workflow group change to reflect the item’s new status.
However, if you do not have permission to edit the content item in this workflow state, you cannot lock the item for editing and the workflow commands will not be displayed.
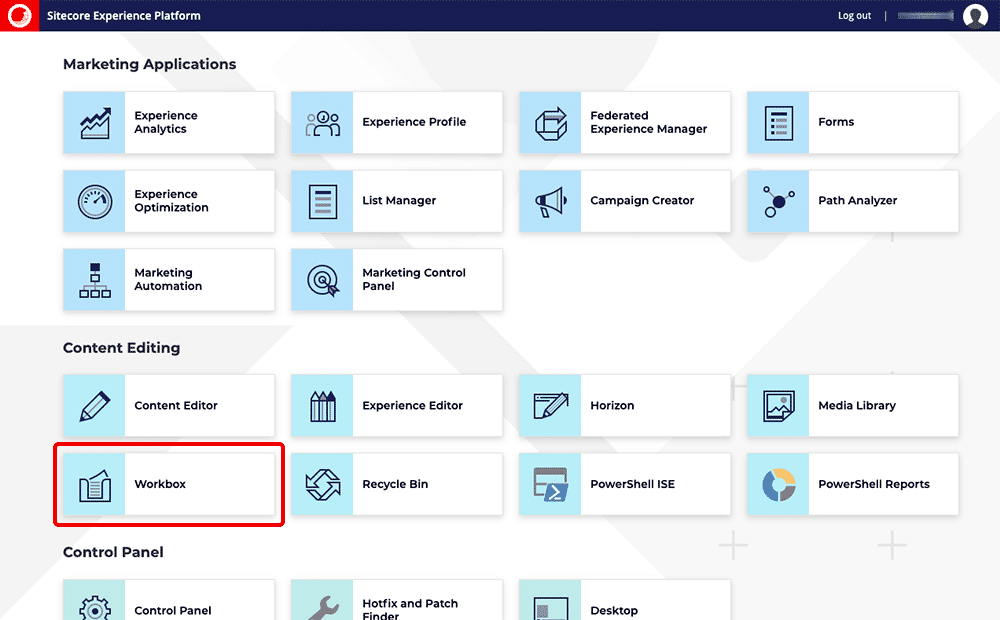
Sitecore also contains a Workbox that has been designed to give reviewers a greater overview of all the content items that are currently in workflows.
Note:Currently, we are logged in as an author, so let’s log off and log in as an approver.
When you need to review content items, you can use the Workbox to see all the content items that are currently in workflows and which workflow states they are in.
To use the Workbox:
-
Log in to the Sitecore Desktop.
-
Click the Sitecore Start button and then Workbox.
In the Workbox, you can see that the Sample Workflow has been selected and you can see all the relevant workflow states. You can also see that there is one content item in the awaiting approval workflow state.
-
In every workflow state, you can preview, open, compare, each content item as well as apply the workflow commands that have been defined for that workflow state.
In the Awaiting Approval workflow state, you can approve, or reject the content item.
To preview the version of a content item that is in a workflow state, click Preview and this version of the item is displayed in a new browser window.
To open a content item, click Open and the item is opened in the Content Editor.
To see the changes that have been made to a content item, click Diff.
The Compare Versions dialog box lets you see the changes that have been made to this version of the item.
You can select which versions to compare and whether you want them displayed in one or two columns.
When you are finished reviewing the content item, click Approve or Reject to move it to the appropriate workflow state.
That’s a basic overview of Sitecore’s Workflows to give you an idea of how to set them up on your site and how they can be useful to your site’s content editors.
Benefits of Setting Workflows
- Better version control:Sitecore workflows enable version control, giving you the tools to revert to previous versions and A/B test different versions of the same content.
- Faster version approval:A solid content workflow enables faster content approval or rejection which simplifies the content editing processes and reduces errors.
- Content preview and edit via Workbox:Sitecore enables users to preview content items in different workflow states, which opens the specific version of that content item in a new browser window.
Sitecore Workflow Best Practices
-
Keep It Simple: Simplicity is the key for everything you do. Sometimes you don’t need more than the three workflows states and adding more stages to your workflow might not really improve your operations.
While Sitecore Workflows allow room for customization, aim at keeping your content process easier and ask yourself, do I really need a new stage?
-
Avoid email Notification of every workflow state: Unwanted notifications can derail productivity.
It’s important to deactivate email notifications of every action and workflow state and only enable email notifications when it’s important for a critical workflow event so editors aren’t burdened with unwanted notifications.
-
Limit workflow publishing to specific roles and users:Not every member of your team needs access to every part of your workflow.
By leveraging Sitecore’s permission engine, you can create workflows that are limited to specific users with particular roles to prevent security breaches and unwanted publications.
Here is a video overview that may be a little dated, but the concepts are still relevant:
Implement Sitecore Workflow With Oshyn
A successful implementation strategy will help lead you to success with Sitecore. As a successful Sitecore partner, Oshyn has built a reputation for building cutting edge digital experiences for major brands.
By partnering closely with clients, our UX, marketing, and technical teams we have the tools to support your Sitecore implementation, from design planning to development, all the way through to support and maintenance.
Learn more about Oshyn’s Sitecore implementation here: Sitecore Implementation 101.
Frequently Asked Questions
XM Cloud is a fully-managed self-service platform that allows developers and marketers to efficiently launch engaging omnichannel experiences in the cloud. All of this is achieved using Sitecore’s headless architecture.
Sitecore Azure gives enterprises an interface to manage their cloud delivery infrastructure and simplify deployment to Microsoft Azure.


